Deploy Application In Remote Cluster via IRSA
KubeRocketCI enables secure deployment of applications to remote AWS EKS clusters using IAM Roles for Service Accounts (IRSA). This guide explains how to configure cross-account access between Kubernetes clusters, allowing applications to be deployed from one AWS account to another without storing long-term credentials. IRSA provides temporary, scoped credentials by allowing Kubernetes service accounts to assume specific IAM roles with precisely defined permissions, enhancing both security and operational efficiency when working with multi-account AWS environments.
Prerequisites
Before implementing IRSA for cross-account deployments, the following requirements must be met:
- Configured two AWS accounts: Account A (where KubeRocketCI is deployed) and Account B (the target account for application deployment)
- Administrative access to both AWS accounts
- Running EKS cluster in Account A with configured OIDC Identity Provider authentication
- Running EKS cluster in Account B as the target cluster for application deployment
- Installed and configured Argo CD.
Architecture and Working Principles
KubeRocketCI uses IRSA to establish secure connections between AWS accounts without storing long-term credentials. The architecture follows these key principles:
- Service Account Federation - Kubernetes service accounts in Account A are federated with AWS IAM through OIDC
- Role Chaining - IAM roles in Account A assume corresponding roles in Account B
- Temporary Credentials - All access is provided through short-lived, automatically rotated tokens
The cross-account deployment process involves two main components:
CD Pipeline Operator Flow:
- The cd-pipeline-operator in Account A uses a service account linked to the
AWSIRSA_{cluster_name}_CDPipelineOperatorIAM role - When new environments or clusters are configured in KubeRocketCI, the
AWSIRSA_{cluster_name}_CDPipelineOperatorrole in Account A assumes theAWSIRSA_{cluster_name}_CDPipelineAgentrole in Account B - The agent role creates the necessary Kubernetes resources (namespaces, service accounts, secrets) in the target cluster
Argo CD Flow:
- Argo CD controllers in Account A use service accounts linked to the
AWSIRSA_{cluster_name}_ArgoCDMasterIAM role - During deployment, this role assumes the
AWSIRSA_{cluster_name}_ArgoCDAgentAccessrole in Account B - The agent role accesses the target EKS cluster to deploy and manage applications
The diagram below illustrates the IRSA access model for cross-account deployments:
Create IAM Roles
To enable cross-account deployments using IRSA, it is necessary to create specific IAM roles in both AWS accounts.
There are two approaches to create the required IAM roles:
- Using the AWS Management Console: This approach is based on creating roles through the AWS web-based interface.
- Using Terraform & AWS Management Console: This hybrid approach is based on using the terraform-aws-platform repository to create the required IAM roles in Account A, while using the AWS Management Console to create the roles in Account B.
Using AWS Management Console
To create the required IAM roles in Account A using the AWS Management Console, follow the steps below:
-
Log in to the AWS Management Console for Account A.
-
Navigate to the IAM service and select Roles.
-
Create the
AWSIRSA_{cluster_name}_CDPipelineOperatorIAM role with the following settings:Trust Policy
{"Version": "2012-10-17","Statement": [{"Sid": "","Effect": "Allow","Principal": {"Federated": "arn:aws:iam::<AWS_ACCOUNT_A_ID>:oidc-provider/oidc.eks.<AWS_REGION>.amazonaws.com/id/<OIDC_ID>"},"Action": "sts:AssumeRoleWithWebIdentity","Condition": {"StringEquals": {"oidc.eks.<AWS_REGION>.amazonaws.com/id/<OIDC_ID>:sub": ["system:serviceaccount:krci:edp-cd-pipeline-operator"],"oidc.eks.<AWS_REGION>.amazonaws.com/id/<OIDC_ID>:aud": "sts.amazonaws.com"}}}]}Permissions Policy
{"Version": "2012-10-17","Statement": [{"Action": "sts:AssumeRole","Effect": "Allow","Resource": "arn:aws:iam::<AWS_ACCOUNT_B_ID>:role/AWSIRSA_{cluster_name}_CDPipelineAgent"}]} -
Create the
AWSIRSA_{cluster_name}_ArgoCDMasterIAM role with the following settings:Trust Policy
{"Version": "2012-10-17","Statement": [{"Sid": "","Effect": "Allow","Principal": {"Federated": "arn:aws:iam::<AWS_ACCOUNT_A_ID>:oidc-provider/oidc.eks.<AWS_REGION>.amazonaws.com/id/<OIDC_ID>"},"Action": "sts:AssumeRoleWithWebIdentity","Condition": {"StringLike": {"oidc.eks.<AWS_REGION>.amazonaws.com/id/<OIDC_ID>:sub": ["system:serviceaccount:argocd:argocd-application-controller","system:serviceaccount:argocd:argocd-applicationset-controller","system:serviceaccount:argocd:argocd-server"],"oidc.eks.<AWS_REGION>.amazonaws.com/id/<OIDC_ID>:aud": "sts.amazonaws.com"}}}]}Permissions Policy
{"Version": "2012-10-17","Statement": [{"Action": "sts:AssumeRole","Effect": "Allow","Resource": ["arn:aws:iam::<AWS_ACCOUNT_B_ID>:role/AWSIRSA_{cluster_name}_ArgoCDAgentAccess"]}]}
To create the required IAM roles in Account B using the AWS Management Console, follow the steps below:
-
Log in to the AWS Management Console for Account B.
-
Navigate to the IAM service and select Roles.
-
Create the
AWSIRSA_{cluster_name}_CDPipelineAgentIAM role with the following settings:Trust Policy
{"Version": "2012-10-17","Statement": [{"Effect": "Allow","Principal": {"AWS": "arn:aws:iam::<AWS_ACCOUNT_A_ID>:role/AWSIRSA_{cluster_name}_CDPipelineOperator"},"Action": "sts:AssumeRole"}]} -
Create the
AWSIRSA_{cluster_name}_ArgoCDAgentAccessIAM role with the following settings:Trust Policy
{"Version": "2012-10-17","Statement": [{"Effect": "Allow","Principal": {"AWS": "arn:aws:iam::<AWS_ACCOUNT_A_ID>:role/AWSIRSA_{cluster_name}_ArgoCDMaster"},"Action": "sts:AssumeRole"}]}
Using Terraform and AWS Management Console
In case of using the terraform-aws-platform repository for creating and managing AWS EKS clusters, the required IAM roles in Account A can be created using Terraform, while the roles in Account B can be created using the AWS Management Console.
To create the required IAM roles in Account A using Terraform, follow the steps below:
-
Clone the forked terraform-aws-platform repository.
-
Navigate to the
eksdirectory. -
Update the
terraform.tfvarsconfiguration file by specifying the following variables:terraform.tfvarscreate_cd_pipeline_operator_irsa = truecreate_argocd_irsa = truecd_pipeline_operator_agent_role_arn = "arn:aws:iam::<AWS_ACCOUNT_B_ID>:role/AWSIRSA_<ClusterName>_CDPipelineAgent"argocd_agent_role_arn = "arn:aws:iam::<AWS_ACCOUNT_B_ID>:role/AWSIRSA_<ClusterName>_ArgoCDAgentAccess" -
Run the following commands to create the IAM roles:
noteIt is highly recommended to run the
terraform plancommand before applying the changes to check the resources that will be created or modified.terraform initterraform apply -var-file=./template.tfvars
To create the required IAM roles in Account B using the AWS Management Console, follow the steps below:
-
Log in to the AWS Management Console for Account B.
-
Navigate to the IAM service and select Roles.
-
Create the
AWSIRSA_{cluster_name}_CDPipelineAgentIAM role with the following settings:Trust Policy
{"Version": "2012-10-17","Statement": [{"Effect": "Allow","Principal": {"AWS": "arn:aws:iam::<AWS_ACCOUNT_A_ID>:role/AWSIRSA_{cluster_name}_CDPipelineOperator"},"Action": "sts:AssumeRole"}]} -
Create the
AWSIRSA_{cluster_name}_ArgoCDAgentAccessIAM role with the following settings:Trust Policy
{"Version": "2012-10-17","Statement": [{"Effect": "Allow","Principal": {"AWS": "arn:aws:iam::<AWS_ACCOUNT_A_ID>:role/AWSIRSA_{cluster_name}_ArgoCDMaster"},"Action": "sts:AssumeRole"}]}
Annotate Service Accounts
To enable the cross-account access for the cd-pipeline-operator and Argo CD, it is necessary to annotate the Kubernetes service accounts in the AWS Account A with the corresponding IAM role ARNs. This allows the service accounts to assume the roles and access resources in the target AWS Account B.
CD Pipeline Operator Service Account
On the AWS Account A, where the KubeRocketCI is deployed, annotate the edp-cd-pipeline-operator service account with the AWSIRSA_{cluster_name}_CDPipelineOperator IAM role ARN.
There are several ways to annotate the service account:
- Values.yaml
- CLI
- Manifests
Update the cd-pipeline-operator configuration in edp-install repository to automatically add annotations to service account:
cd-pipeline-operator:
  serviceAccount:
    annotations:
      eks.amazonaws.com/role-arn: "arn:aws:iam::<AWS_ACCOUNT_A_ID>:role/AWSIRSA_{cluster_name}_CDPipelineOperator"
kubectl patch serviceaccount edp-cd-pipeline-operator -n krci \
  -p '{"metadata": {"annotations": {"eks.amazonaws.com/role-arn": "arn:aws:iam::<AWS_ACCOUNT_A_ID>:role/AWSIRSA_{cluster_name}_CDPipelineOperator"}}}'
After applying annotations to service accounts, it is necessary to restart the corresponding deployments to ensure new pods are created with the updated IAM roles configuration. Use the following command:
kubectl rollout restart deployment cd-pipeline-operator -n krci
apiVersion: v1
kind: ServiceAccount
metadata:
  annotations:
    eks.amazonaws.com/role-arn: "arn:aws:iam::<AWS_ACCOUNT_A_ID>:role/AWSIRSA_{cluster_name}_CDPipelineOperator"
  name: edp-cd-pipeline-operator
  namespace: krci
After applying annotations to service accounts, it is necessary to restart the corresponding deployments to ensure new pods are created with the updated IAM roles configuration. Use the following command:
kubectl rollout restart deployment cd-pipeline-operator -n krci
Argo CD Service Accounts
On the AWS Account A, where the Argo CD is deployed, annotate the argocd-application-controller, argocd-applicationset-controller, and argocd-server service accounts with the AWSIRSA_{cluster_name}_ArgoCDMaster IAM role ARN.
There are several ways to annotate the service accounts:
- Values.yaml
- CLI
- Manifests
Update the Argo CD configuration in Add-Ons repository to automatically add annotations to service accounts:
argo-cd:
  controller:
    serviceAccount:
      # -- Annotations applied to created service account
      annotations:
        eks.amazonaws.com/role-arn: "arn:aws:iam::<AWS_ACCOUNT_A_ID>:role/AWSIRSA_{cluster_name}_ArgoCDMaster"

  server:
    serviceAccount:
      # -- Annotations applied to created service account
      annotations:
        eks.amazonaws.com/role-arn: "arn:aws:iam::<AWS_ACCOUNT_A_ID>:role/AWSIRSA_{cluster_name}_ArgoCDMaster"

  applicationSet:
    serviceAccount:
      # -- Annotations applied to created service account
      annotations:
        eks.amazonaws.com/role-arn: "arn:aws:iam::<AWS_ACCOUNT_A_ID>:role/AWSIRSA_{cluster_name}_ArgoCDMaster"
kubectl patch serviceaccount argocd-application-controller -n argocd \
  -p '{"metadata": {"annotations": {"eks.amazonaws.com/role-arn": "arn:aws:iam::<AWS_ACCOUNT_A_ID>:role/AWSIRSA_{cluster_name}_ArgoCDMaster"}}}'
kubectl patch serviceaccount argocd-applicationset-controller -n argocd \
  -p '{"metadata": {"annotations": {"eks.amazonaws.com/role-arn": "arn:aws:iam::<AWS_ACCOUNT_A_ID>:role/AWSIRSA_{cluster_name}_ArgoCDMaster"}}}'
kubectl patch serviceaccount argocd-server -n argocd \
  -p '{"metadata": {"annotations": {"eks.amazonaws.com/role-arn": "arn:aws:iam::<AWS_ACCOUNT_A_ID>:role/AWSIRSA_{cluster_name}_ArgoCDMaster"}}}'
After applying annotations to service accounts, it is necessary to restart the corresponding workloads to ensure new pods are created with the updated IAM roles configuration. To do this, use the following commands:
kubectl delete pod -l app.kubernetes.io/name=argocd-application-controller -n argocd

kubectl delete pod -l app.kubernetes.io/name=argocd-applicationset-controller -n argocd

kubectl delete pod -l app.kubernetes.io/name=argocd-server -n argocd
apiVersion: v1
kind: ServiceAccount
metadata:
  annotations:
    eks.amazonaws.com/role-arn: "arn:aws:iam::<AWS_ACCOUNT_A_ID>:role/AWSIRSA_{cluster_name}_ArgoCDMaster"
  name: argocd-application-controller
  namespace: argocd
---
apiVersion: v1
kind: ServiceAccount
metadata:
  annotations:
    eks.amazonaws.com/role-arn: "arn:aws:iam::<AWS_ACCOUNT_A_ID>:role/AWSIRSA_{cluster_name}_ArgoCDMaster"
  name: argocd-applicationset-controller
  namespace: argocd
---
apiVersion: v1
kind: ServiceAccount
metadata:
  annotations:
    eks.amazonaws.com/role-arn: "arn:aws:iam::<AWS_ACCOUNT_A_ID>:role/AWSIRSA_{cluster_name}_ArgoCDMaster"
  name: argocd-server
  namespace: argocd
After applying annotations to service accounts, it is necessary to restart the corresponding workloads to ensure new pods are created with the updated IAM roles configuration. To do this, use the following commands:
kubectl delete pod -l app.kubernetes.io/name=argocd-application-controller -n argocd

kubectl delete pod -l app.kubernetes.io/name=argocd-applicationset-controller -n argocd

kubectl delete pod -l app.kubernetes.io/name=argocd-server -n argocd
Update Argo CD AppProject
API server endpoint can be found in the EKS cluster details in the AWS Management Console.
To allow Argo CD to deploy applications in the target cluster in Account B, it is necessary to update the AppProject configuration to include the target cluster as a destination.
apiVersion: argoproj.io/v1alpha1
kind: AppProject
metadata:
  name: krci
  namespace: argocd
spec:
  destinations:
    - namespace: krci-*
      server: https://<OIDC_ID>.gr7.<AWS_REGION_ACCOUNT_B>.eks.amazonaws.com
Configure IAM Roles Access to EKS Cluster
To allow the IAM roles created in Account B to access the EKS cluster, it is necessary to configure the access permissions for the roles in the cluster. This can be done by creating the Access Entry objects for the AWSIRSA_{cluster_name}_CDPipelineAgent and AWSIRSA_{cluster_name}_ArgoCDAgentAccess IAM roles.
To configure the access permissions for the IAM roles for the EKS cluster in Account B, follow the steps below:
CD Pipeline Operator Access Entry
To create the Access Entry for the AWSIRSA_{cluster_name}_CDPipelineAgent IAM role, follow the steps below:
-
Log in to the AWS Management Console for Account B.
-
Navigate to the EKS service and select the target cluster.
-
In the Access tab, click on Create access entry.

-
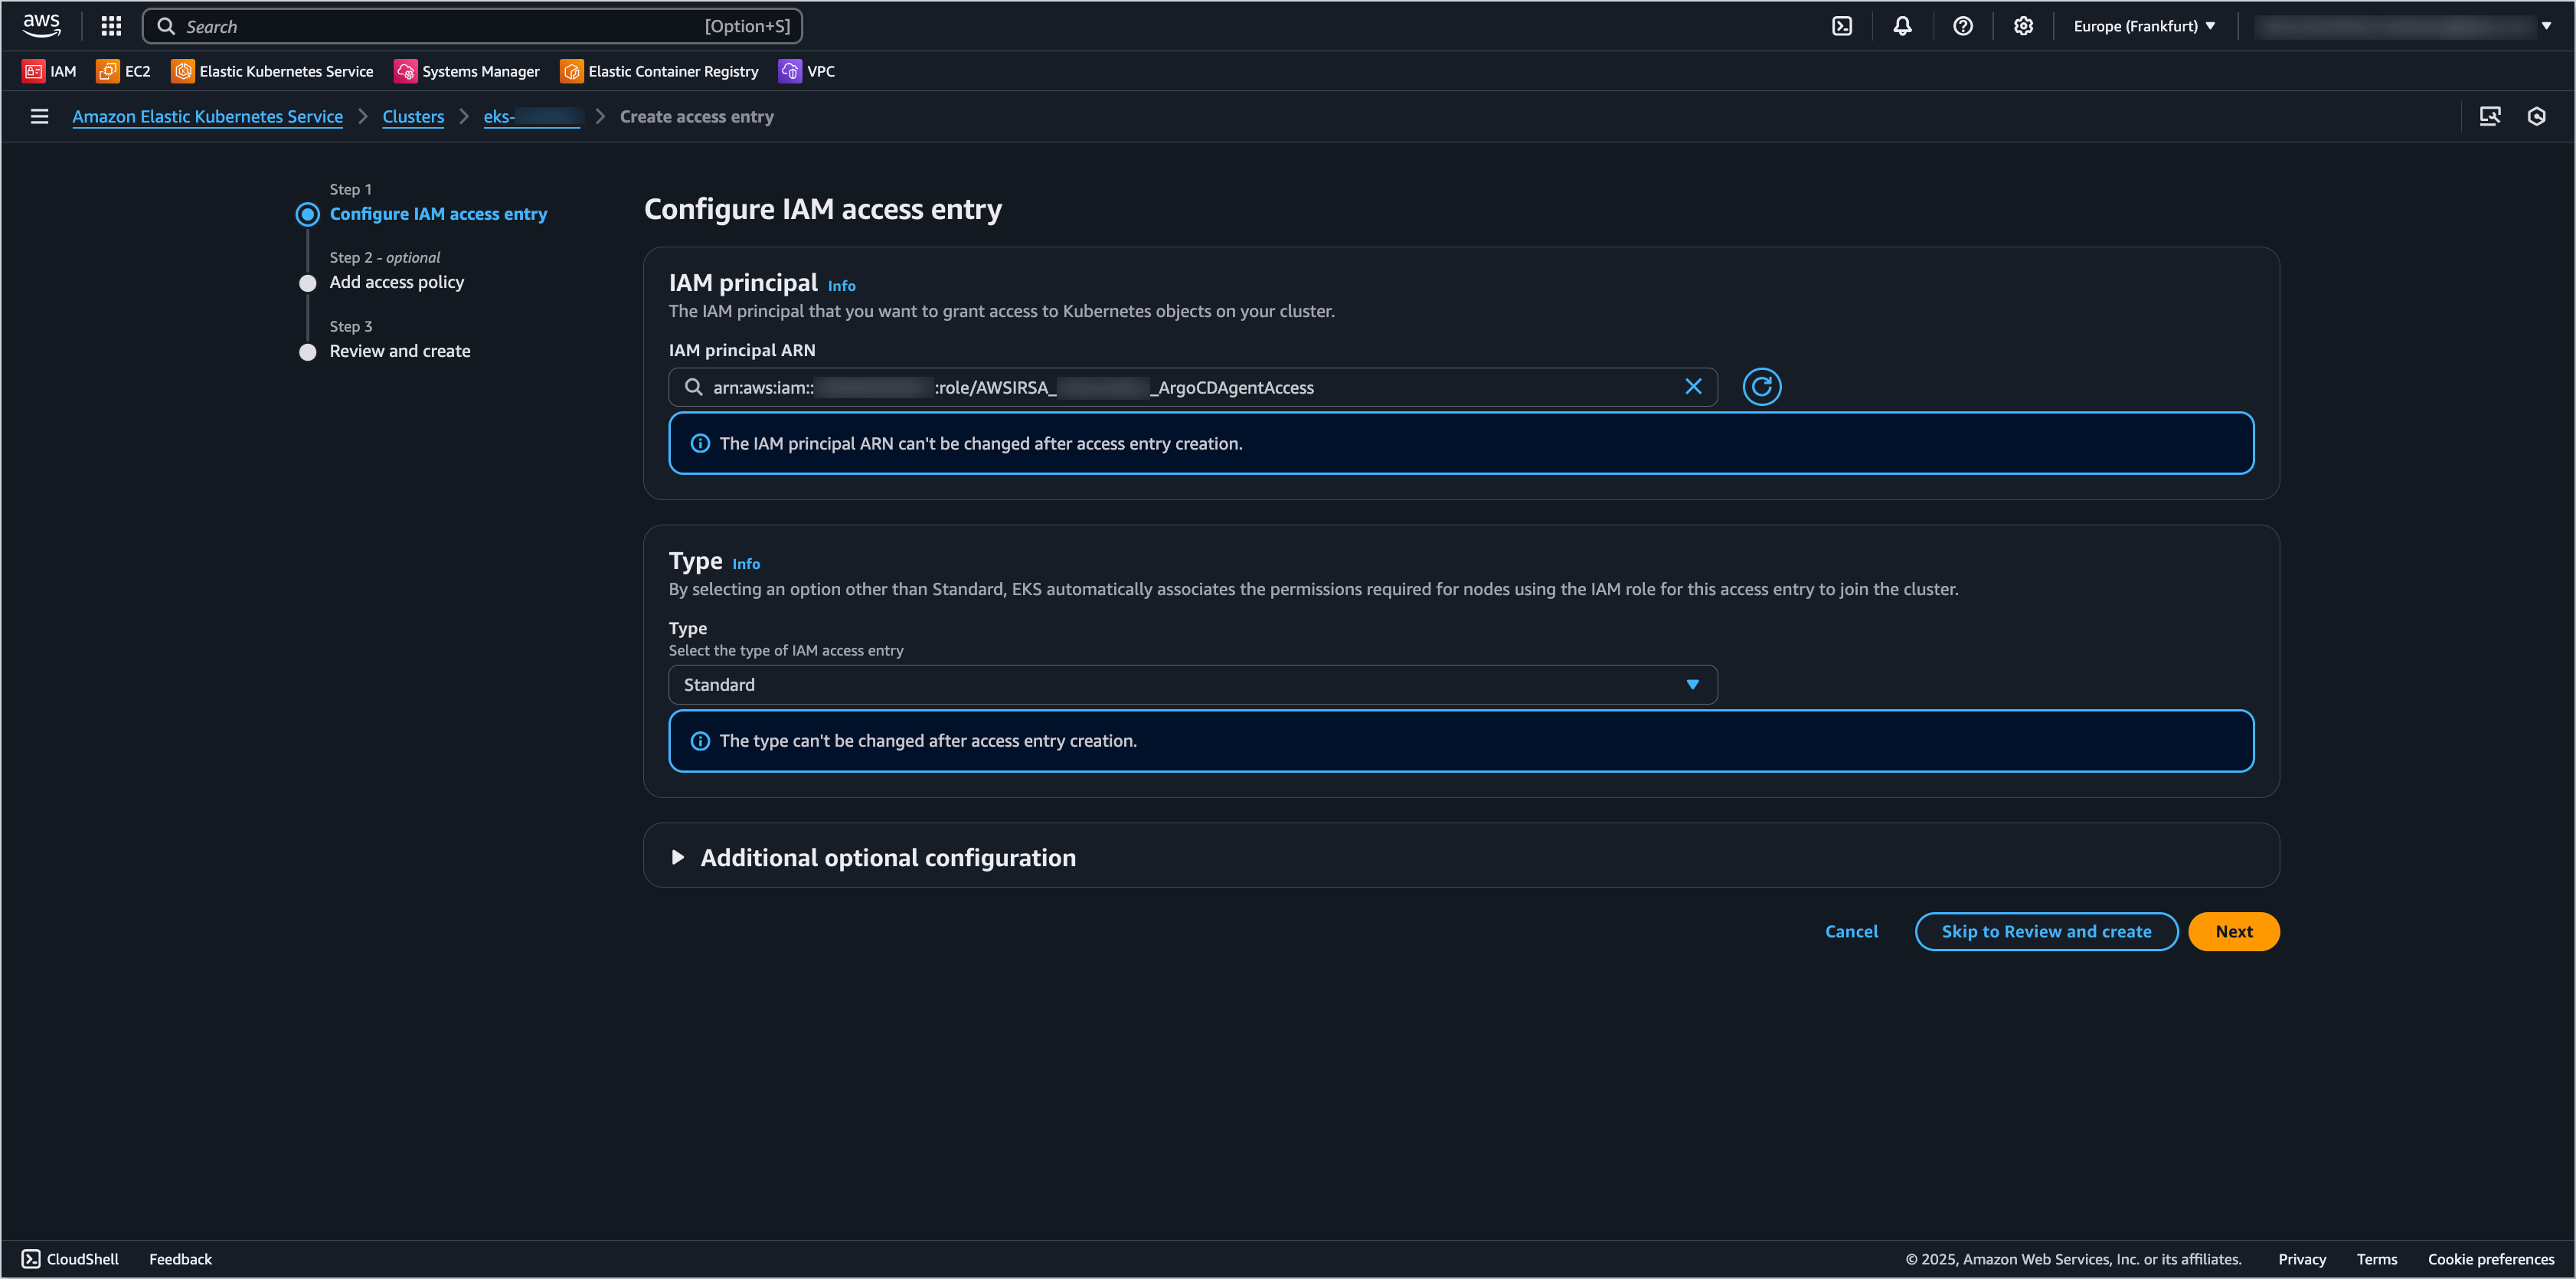
On the Configure IAM access entry page, specify the following settings:
- IAM principal ARN:
arn:aws:iam::<AWS_ACCOUNT_B_ID>:role/AWSIRSA_{cluster_name}_CDPipelineAgent - Type:
Standard - Kubernetes groups:
cd-pipeline-operator(required if Capsule Tenant is used)

Click Next to proceed.
- IAM principal ARN:
-
On the Add access policy page, select the AmazonEKSClusterAdminPolicy policy and click Add policy button.
noteIf Capsule Tenant is used, it is not necessary to add the
AmazonEKSClusterAdminPolicypolicy, as the access will be managed by Capsule.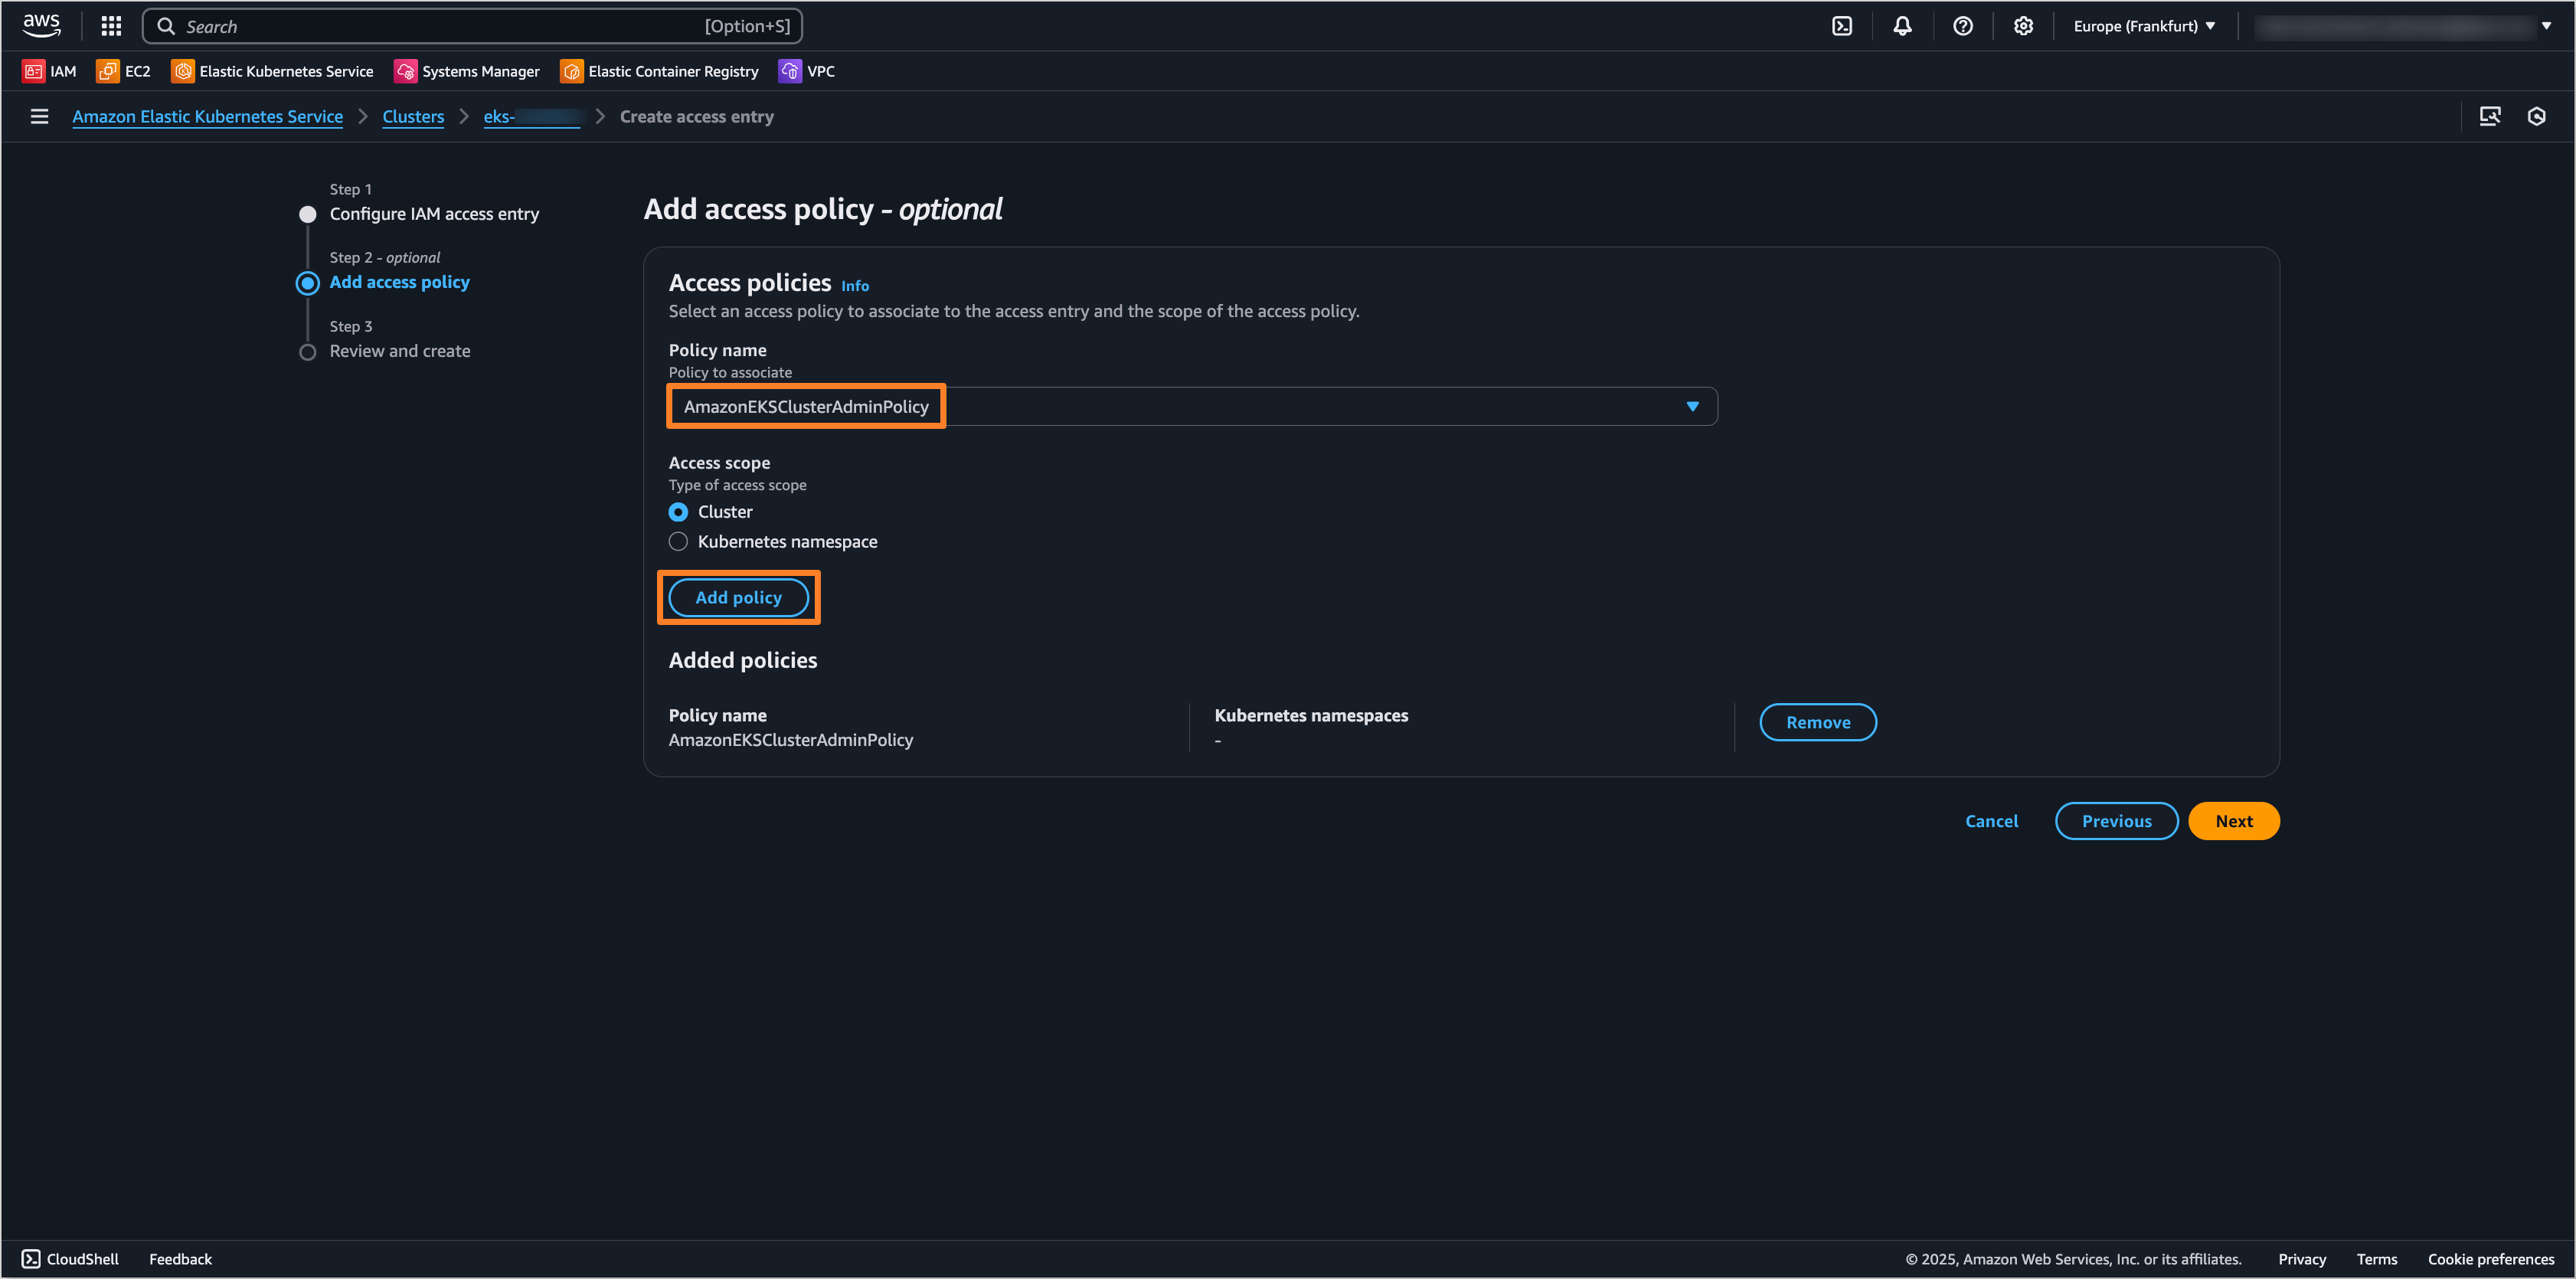
Click Next to proceed.
-
On the Review and create page, review the settings and click Create access entry to create the Access Entry.
Argo CD Access Entry
To create the Access Entry for the AWSIRSA_{cluster_name}_ArgoCDAgentAccess IAM role, follow the steps below:
-
Log in to the AWS Management Console for Account B.
-
Navigate to the EKS service and select the target cluster.
-
In the Access tab, click on Create access entry.
-
On the Configure IAM access entry page, specify the following settings:
- IAM principal ARN:
arn:aws:iam::<AWS_ACCOUNT_B_ID>:role/AWSIRSA_{cluster_name}_ArgoCDAgentAccess - Type:
Standard
Click Next to proceed.
- IAM principal ARN:
-
On the Add access policy page, select the AmazonEKSClusterAdminPolicy policy and click Add policy button.
Click Next to proceed.
-
On the Review and create page, review the settings and click Create access entry to create the Access Entry.
Configure Capsule Tenant (Optional)
If Capsule is used for multi-tenancy in the EKS cluster in Account B, it is necessary to configure the Capsule Tenant for the cd-pipeline-operator group. This allows the AWSIRSA_{cluster_name}_ArgoCDAgentAccess IAM role to have the necessary permissions to manage resources within the Capsule Tenant.
To configure the Capsule Tenant for the cd-pipeline-operator group, align the following Capsule resources in the EKS cluster in Account B:
Capsule Configuration
apiVersion: capsule.clastix.io/v1beta2
kind: CapsuleConfiguration
metadata:
  name: default
spec:
  userGroups:
    - capsule.clastix.io
    - cd-pipeline-operator
Capsule Tenant
apiVersion: capsule.clastix.io/v1beta2
kind: Tenant
metadata:
  name: krci
spec:
  owners:
    - clusterRoles:
        - admin
        - capsule-namespace-deleter
      kind: Group
      name: cd-pipeline-operator
Next Steps
After completing the IRSA configuration on both AWS accounts, it is possible to deploy applications to the remote EKS cluster in Account B using KubeRocketCI. To proceed with the adding the remote cluster and deploying applications, refer to the Add Cluster guide.