EKS OIDC With Keycloak
This article provides the instruction of configuring Keycloak as OIDC Identity Provider for EKS. The example is implemented following the KubeRocketCI add-ons approach.
Prerequisites
To follow the instruction, check the following prerequisites:
- (Optional) Terraform version 1.5.7
- Kubelogin version >= v1.25.1
- (Optional) EDP Cluster Add-ons Solution is applied
- (Optional) External Secrets Operator
- A running Keycloak instance
- The Keycloak operator is deployed
- The Keycloak Realm's OIDC discovery URL and jwks_uri endpoints are publicly accessible
To connect OIDC with a cluster, install and configure the kubelogin plugin. For Windows, it is recommended to download the kubelogin as a binary and add it to your PATH.
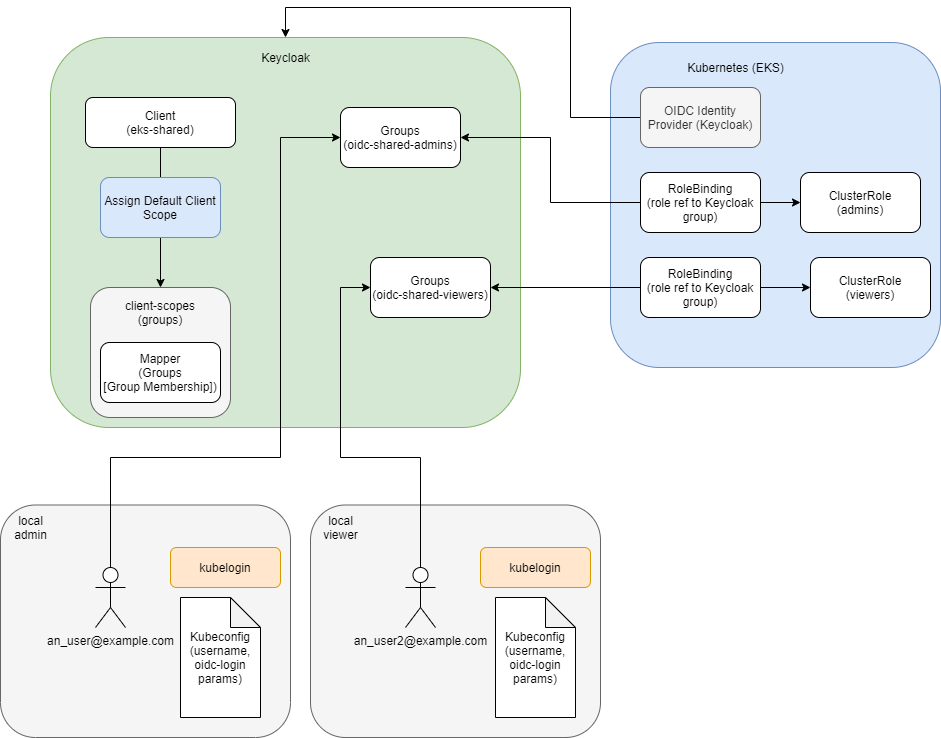
Solution Overview
This architecture encompasses three primary resource types: AWS (EKS), Keycloak, and Kubernetes.
Within this setup, the Keycloak resources, once established, remain static, facilitating the assignment of claims based on user group memberships. This stability contrasts with the dynamic nature of other resources, which may be created, modified, or deleted as necessary.
Of particular importance within the Kubernetes ecosystem are the RoleBindings and ClusterRoles/Roles. These elements define a permissions framework, where Roles specify the permissions available, and RoleBindings serve to associate those Roles with specific Keycloak groups. This association ensures that members of a group are granted only the permissions that are pertinent to their role.
Keycloak Configuration
The initial step involves setting up the Keycloak operator (configure connections to the Keycloak instance) and along creation its associated resources, including realms, clients, roles, and groups.
-
Create user with necessary privileges to Keycloak:
- External Secret Operator
- Manual
Store user credentials in AWS Parameter Store:
AWS Parameter Store{"keycloak": {"username": "<KEYCLOAK_USERNAME>","password": "<KEYCLOAK_PASSWORD>"}}Deactivate the External Secret Operator within the primary kuberocketci-rbac chart:
values.yaml# Configure components of the External Secrets Operator (ESO).eso:# -- Install components of the ESO.enabled: falseCreate secret with user credentials:
kubectl create secret generic keycloak \--from-literal=username=<KEYCLOAK_USERNAME> \--from-literal=password=<KEYCLOAK_PASSWORD> -
Begin by installing the kuberocketci-rbac add-on. This can be accomplished through the use of the add-ons method, as detailed in the addons approach. Utilize the following values in the
values.yamlfile:values.yamlkeycloakUrl: "https://example.com"# -- This block enable the creation of Keycloak operator resources for the# EKS OIDC configuration, such as client, client scope, and realm groups.kubernetes:enabled: true -
Activate the kuberocketci-rbac add-on within the application settings:
values.yamlkuberocketci-rbac:createNamespace: trueenable: true
This add-ons facilitates sets up a broker realm to manage traffic redirection between external Identity Providers (IdP) and internal clients. Additionally, it creates a shared realm that encompasses all clients, including to EKS, Sonar, Nexus, and Portal.
The KubeRocketCI RBAC add-on creates Keycloak groups that are used in the KubeRocketCI platform to manage access to resources. For more details refer to the KubeRocketCI Groups documentation.
AWS Configuration
Below are the guidelines for configuring identity provider in Kubernetes cluster:
- Terraform
- AWS Console UI
For integrating OpenID Connect (OIDC) with Amazon EKS through terraform, it's essential to update the EKS module within your terraform repository. The relevant repository can be found at KubeRocketCI's terraform-aws-platform. Adjust the module by incorporating the following configuration in the eks/template.tfvars file:
# OIDC Identity provider configuration
cluster_identity_providers = {
  keycloak = {
    client_id       = "eks"
    issuer_url      = "https://example.com/auth/realms/shared"
    groups_claim    = "groups"
    username_claim  = "preferred_username"
    username_prefix = "-"
  }
}
This configuration snippet specifies the Keycloak as the OIDC Identity Provider for your EKS cluster. It includes the client ID (eks), the issuer URL (pointing to the Keycloak realm), and the claim used for groups (groups). This setup ensures that authentication and authorization mechanisms for accessing the EKS cluster are correctly configured to use Keycloak as the identity provider.
username_claim and username_prefix control how the authenticated user shows up as a Kubernetes username (in RBAC, kubectl output, and audit logs). Leaving them unset makes Kubernetes fall back to the sub claim (an opaque Keycloak user ID) prefixed with the issuer URL — see the Access Validation section below. Setting username_claim to preferred_username (or email) yields a human-readable username instead. Prefer preferred_username over email: Kubernetes' OIDC authenticator rejects tokens with email_verified: false, which is common for users brokered from a SAML upstream IdP (e.g. Azure AD) since SAML has no email_verified equivalent. username_prefix = "-" disables prefixing entirely; RBAC in this setup is unaffected either way, since group membership (not username) drives authorization.
The objective is to configure an Identity Provider within your Kubernetes cluster. The process involves several steps within the AWS Management Console:
- Begin by opening the AWS Management Console.
- Navigate to the Elastic Kubernetes Service (EKS) section.
- Select your specific Cluster name.
- Go to the Access tab, then find and select the OIDC identity providers section.
- Click on Associate identity provider.
When associating the identity provider, ensure you input the following details:
Issuer URL: https://example.com/auth/realms/shared
Client ID: eks
Groups Claim: groups
Username Claim: preferred_username
Username Prefix: -
Kubeconfig
Template for kubeconfig:
apiVersion: v1
preferences: {}
kind: Config

clusters:
- cluster:
    server: https://<eks_url>.eks.amazonaws.com
    certificate-authority-data: <certificate_authority_data>
  name: eks

contexts:
- context:
    cluster: eks
    user: <keycloak_user_email>
  name: eks

current-context: eks

users:
- name: <keycloak_user_email>
  user:
    exec:
      apiVersion: client.authentication.k8s.io/v1beta1
      command: kubectl
      args:
      - oidc-login
      - get-token
      - -v1
      - --oidc-issuer-url=https://<keycloak_url>/auth/realms/shared
      - --oidc-client-id=eks
      - --oidc-client-secret=<keycloak_client_secret>
Flag -v1 can be used for debug, in a common case it's not needed and can be deleted.
To find the client secret:
- Open Keycloak
- Choose Shared realm
- Find eks keycloak client
- Open Credentials tab
- Copy Secret
Access Validation
To validate access to the Kubernetes cluster by using the default cluster-admin role. Assign the user the oidc-cluster-admins Keycloak group.
To add a user to a Keycloak group, follow these steps:
- Open Keycloak
- Choose Shared realm
- Open user screen with search field
- Find a user and open the configuration
- Open Groups tab
- In Available Groups, choose an oidc-cluster-admins group
- Click the Join button
- The group should appear in the User's Group Membership list
As a result, the required access mapping is implemented using the following resources:
| Keycloak Group Name | Kubernetes ClusterRole | Kubernetes ClusterRoleBinding |
|---|---|---|
| oidc-cluster-admins | cluster-admin (built-in) | cluster-admin |
In this configuration, the Keycloak oidc-cluster-admins group is mapped to the Kubernetes cluster-admin role. This setup grants members of the oidc-cluster-admins group the necessary permissions to perform administrator management in the Kubernetes cluster. You can further customize access by associating different Keycloak groups with specific Kubernetes roles.
KubeRocketCI follows the same approach for managing access to its resources. For more information, refer to the KubeRocketCI Groups documentation.
Follow the steps below to test the configuration:
-
Run kubectl command, it is important to specify the correct kubeconfig:
KUBECONFIG=<path_to_oidc_kubeconfig> kubectl get ingresses -n <namespace_name> -
After the first run and redirection to the Keycloak login page, log in using credentials (login:password) or using SSO Provider. In case of the successful login, you will receive the following notification that can be closed:

-
As the result, a respective response from the Kubernetes will appear in the console in case a user is configured correctly and is a member of the correct group and Roles/RoleBindings.
-
If something is not set up correctly, the following output error will be displayed:
Error from server (Forbidden): ingresses.networking.k8s.io is forbidden:User "<keycloak_user_email>"cannot list resource "ingresses" in API group "networking.k8s.io" in the namespace "<namespace_name>"noteThe
Userfield reflects whateverusername_claim/username_prefixare configured in AWS Configuration above. Withoutusername_claimset, it instead showshttps://<keycloak_url>/auth/realms/shared#<keycloak_user_id>(thesubclaim prefixed with the issuer URL) — harder to attribute to a real user inkubectloutput and audit logs.
Session Update
To update the session, clear cache. The default location for the login cache:
rm -rf ~/.kube/cache
Access Cluster via Lens
To access the Kubernetes cluster via Lens, follow the steps below to configure it:
- Add a new kubeconfig to the location where Lens has access. The default location of the kubeconfig is ~/.kube/config but it can be changed by navigating to File -> Preferences -> Kubernetes -> Kubeconfig Syncs.
- (Optional) Using Windows, it is recommended to reboot the system after adding a new kubeconfig.
- Authenticate on the Keycloak login page to be able to access the cluster.
Lens does not add namespaces of the project automatically, so it is necessary to add them manually, simply go to Settings -> Namespaces and add the namespaces of a project.
Changing the Lifespan of an Access Token
By default, the Keycloak token has a lifespan of 5 minutes. To modify this duration refer to the guidelines outlined in this document.