KubeRocketCI CLI Keycloak Client
The KubeRocketCI CLI authenticates users through the browser (OAuth 2.0 authorization code flow with PKCE). This page describes how to register a public OpenID Connect client in Keycloak so operators can run krci auth login against your KubeRocketCI Portal.
Create the client in the same realm the Portal already uses. To confirm the realm, inspect the OIDC settings returned by the Portal, for example the endpoint GET /rest/v1/config/oidc on your Portal base URL (replace the host with yours):
GET https://portal.example.com/rest/v1/config/oidc
Create the client only in the Platform realm you identified above. Application clients belong there, not in Keycloak’s built-in administrative realms.
Configure via KeycloakClient (GitOps)
If your cluster is managed with edp-cluster-add-ons and the Keycloak Operator is installed, you can provision the krci-cli client as a KeycloakClient custom resource instead of using the Admin Console.
The reference manifest ships with the kuberocketci-rbac add-on:
clusters/core/addons/kuberocketci-rbac/templates/broker/keycloak-client-krci-cli.yaml
It creates a public OpenID Connect client in the Platform broker realm (realmRef.kind: KeycloakRealm). This matches the realm the Portal typically uses (confirm via GET /rest/v1/config/oidc on your Portal URL).
The manifest configures:
- Client ID:
krci-cli - Redirect URIs:
http://127.0.0.1/*,http://localhost/* - Default scopes:
profile,email,roles,groups - Audience mapper:
kubernetes(for clusters with an OIDC-enabled API server)
Other Keycloak clients in add-ons may reference ClusterKeycloakRealm (for example realm main / shared). The CLI client is intentionally created in the broker realm, alongside the Portal OIDC issuer.
Enable the add-on in your fork, sync the Argo CD application, then verify reconciliation:
kubectl get keycloakclient krci-cli -n security
Expected status: OK.
When the client is reconciled from Git by the Keycloak Operator, changes made in the Keycloak Admin Console may be overwritten. Update the manifest in your add-ons repository to persist configuration changes.
If add-ons are not used, or you manage a standalone Keycloak instance, follow the manual steps below in the same realm your Portal uses.
Configure Manually in Keycloak Admin Console
For a manual setup, use the Keycloak Admin Console to select the same realm as the Portal, create the public krci-cli client, review client scopes and token settings, add the Kubernetes audience mapper, and then verify login from your workstation.
Select Realm
In the Keycloak Admin Console, use the realm drop-down in the top-left corner and select the realm your Portal uses.
Create Client
The next step is to create a Keycloak client itself:
-
In the left sidebar, open Clients, then click Create client.
-
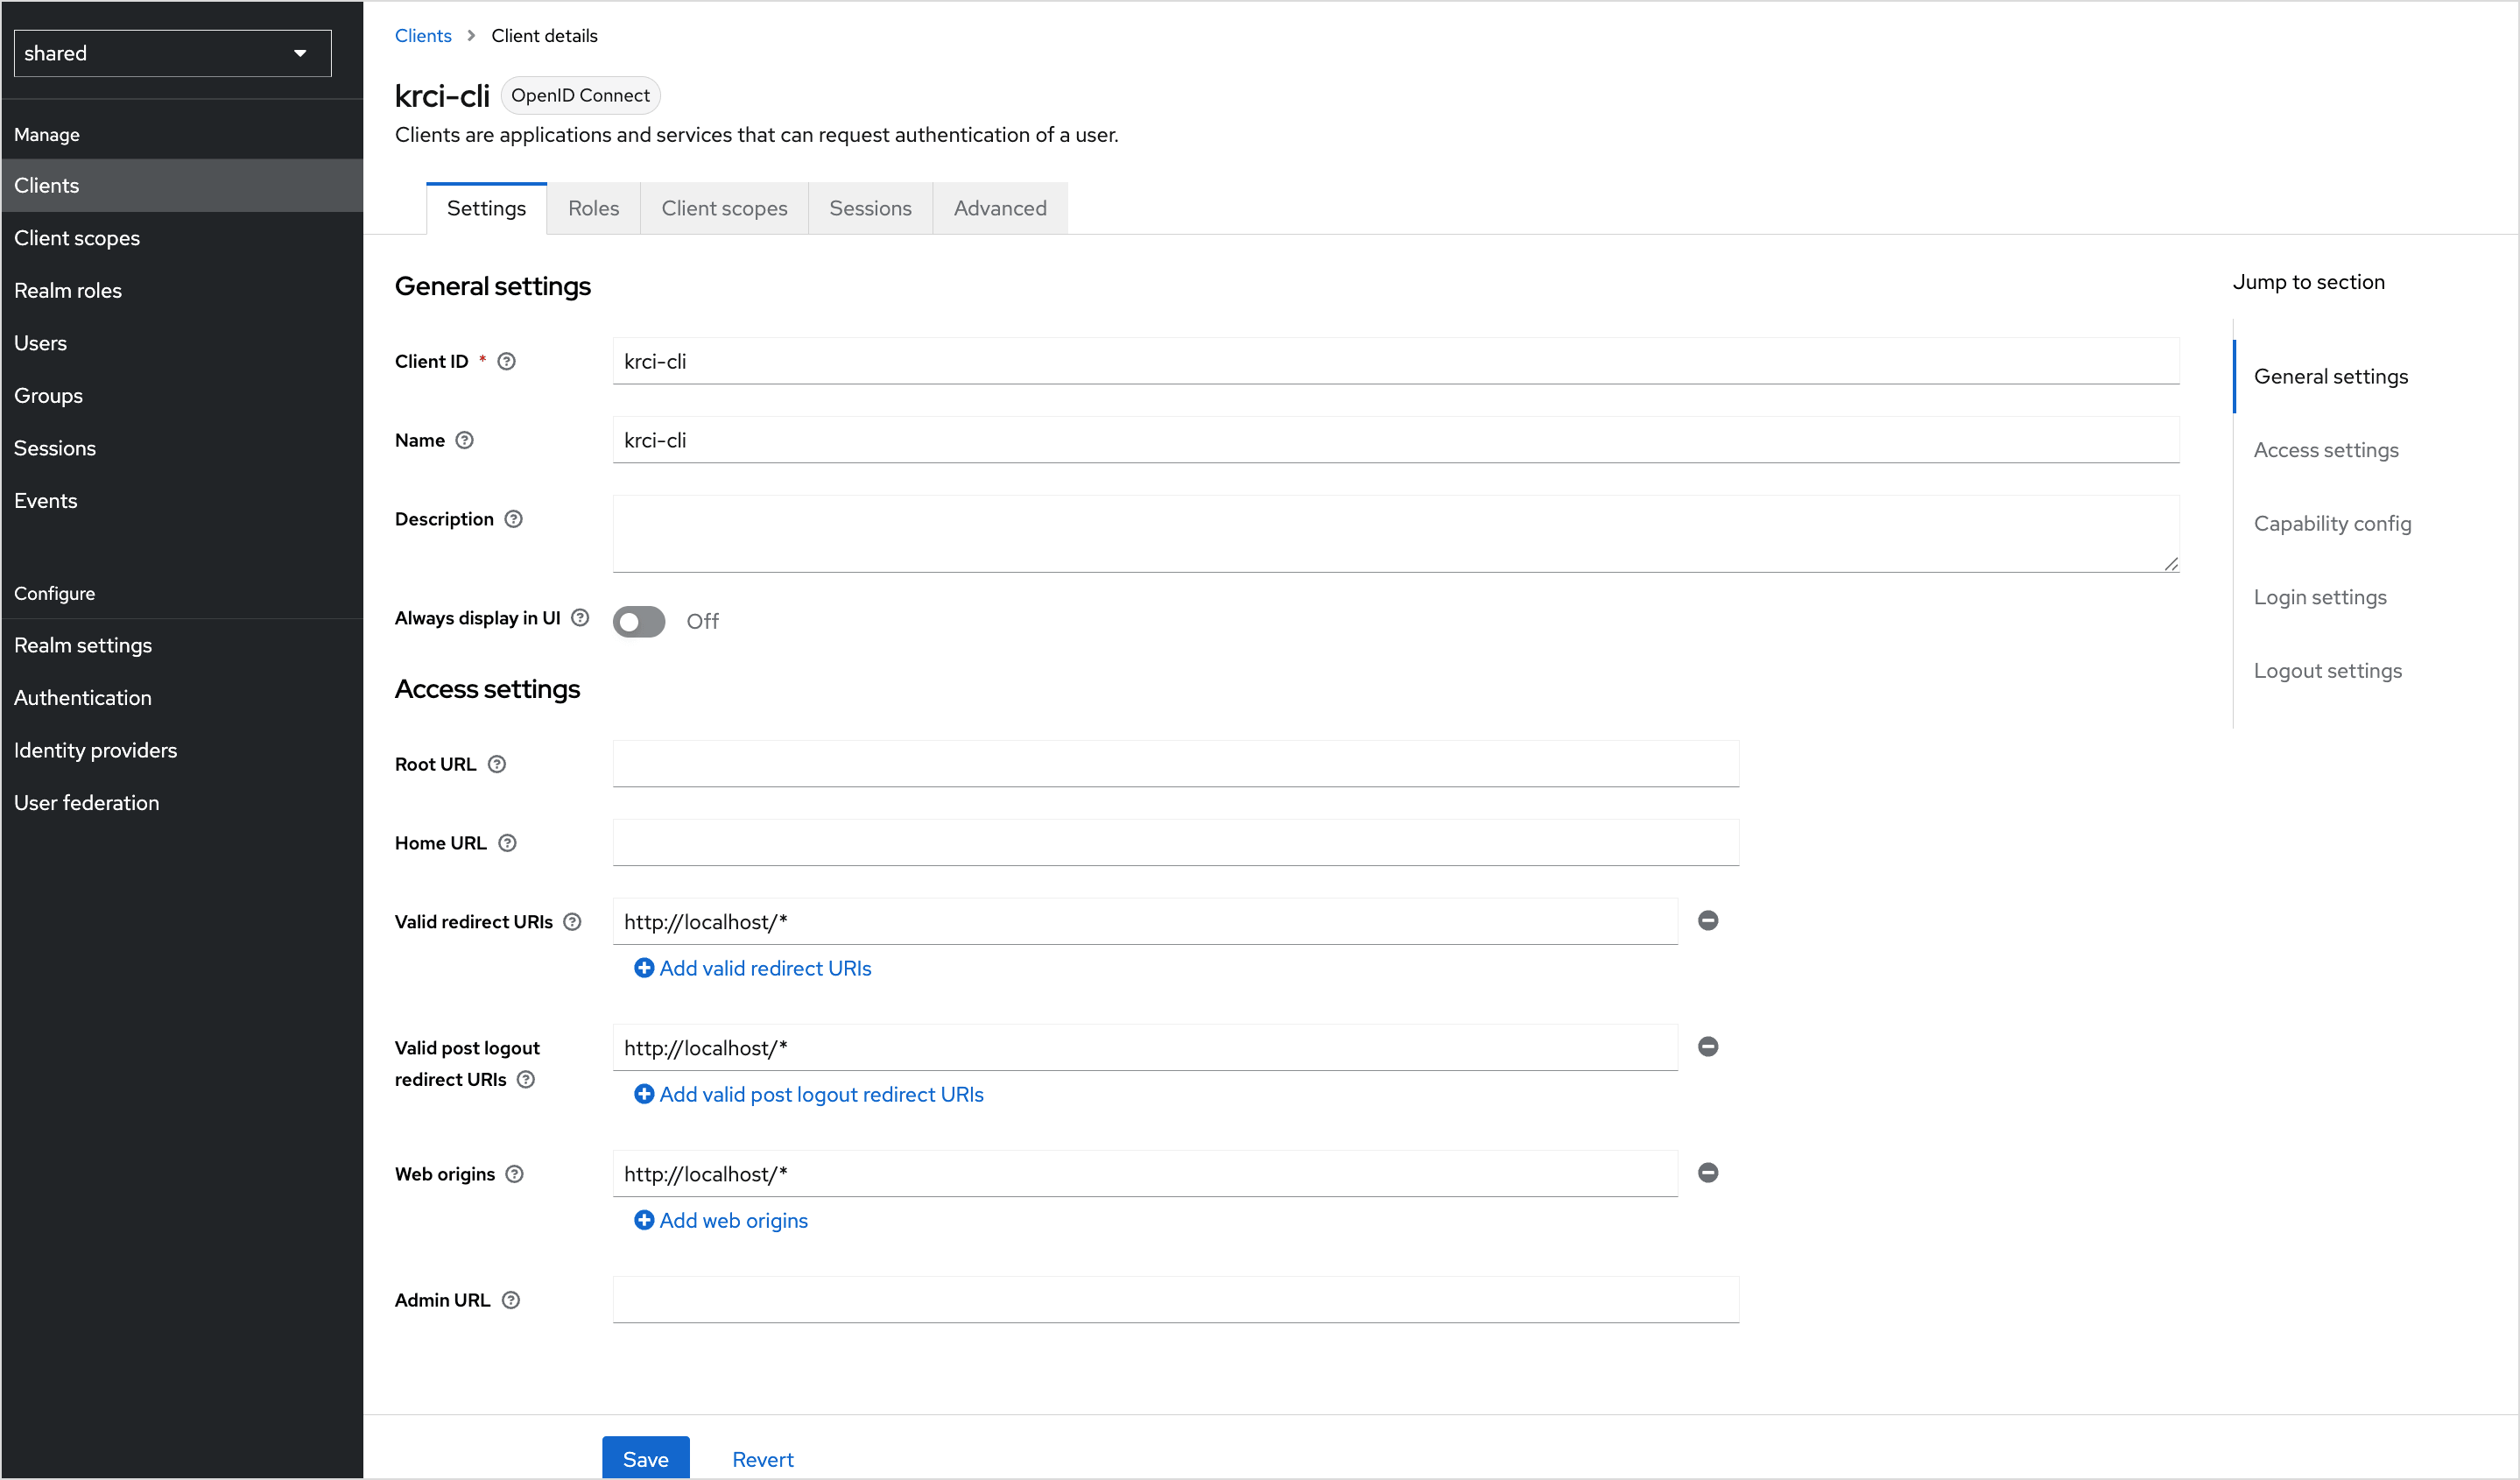
On General settings, set the fields as follows:
Field Value Client type OpenID Connect Client ID krci-cliName KubeRocketCI CLI (display only) Description Public OIDC client for the KubeRocketCI CLI (PKCE) Always display in console Off -
Click Next.
-
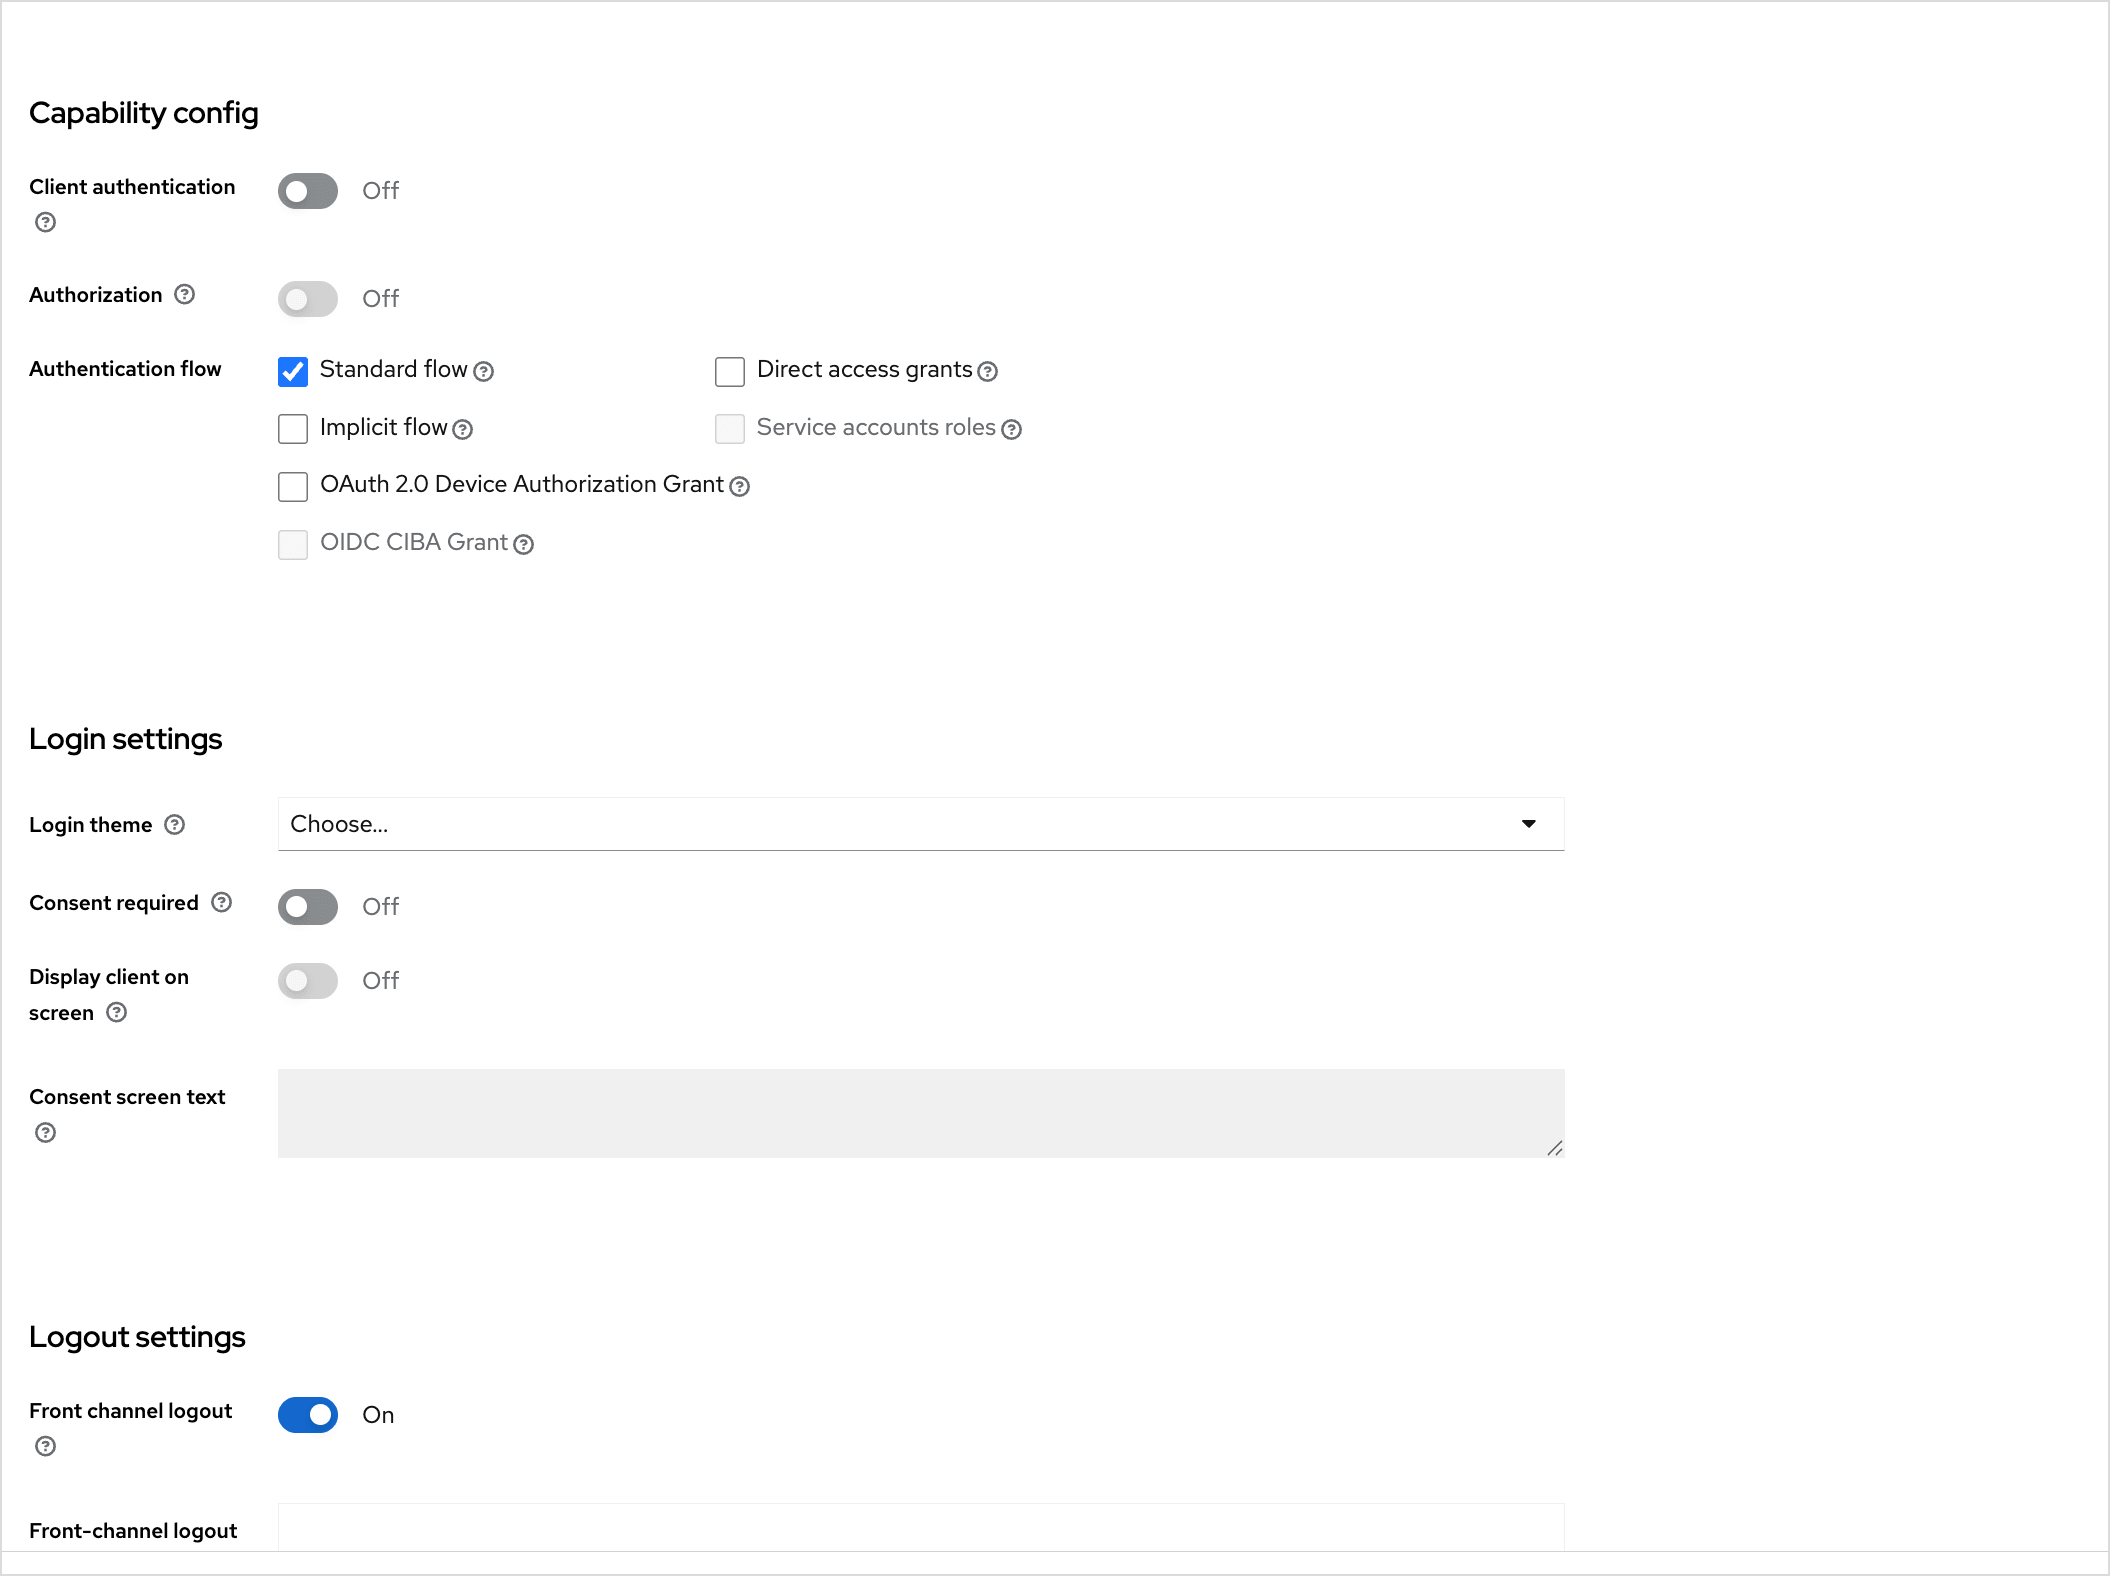
On Capability config, set the toggles:
Toggle Value Note Client authentication Off Public client (no client secret) Authorization Off — Standard flow On Authorization code flow Direct access grants Off — Implicit flow Off — Service accounts roles Off — OAuth 2.0 Device Authorization Grant Off Browser-based login OIDC CIBA Grant Off — -
Click Next.
-
On Login settings, configure URLs:
Field Value Root URL (empty) Home URL (empty) Valid redirect URIs http://127.0.0.1/*andhttp://localhost/*(add both)Valid post logout redirect URIs (empty) Web origins +(allow all origins configured for this client)noteThe CLI binds a callback listener on
localhostwith a random port on each login, so wildcard redirect URIs are required. -
Click Save. You are taken to the client Settings page.
The screenshots below illustrate Access settings (client ID, redirect URIs, web origins) and Capability config / Login settings on a typical Keycloak deployment.
Enforce PKCE (S256)
To enforce PKCE, do these steps:
- Open the Advanced tab for the
krci-cliclient. - Under Advanced settings, set Proof Key for Code Exchange Code Challenge Method to S256.
- Click Save for that section.
This ensures Keycloak only accepts logins that send a PKCE code challenge, which matches how the CLI performs authorization.
Configure Token Lifetimes
On the client Advanced tab, you can leave Access Token Lifespan and session timeouts inherited from the realm (for example five to fifteen minutes for access tokens), or set client-specific values.
At realm level (Realm settings → Tokens), confirm OAuth 2.0 Refresh Token Rotation matches your security policy. The CLI refreshes tokens using the standard OAuth2 token endpoint.
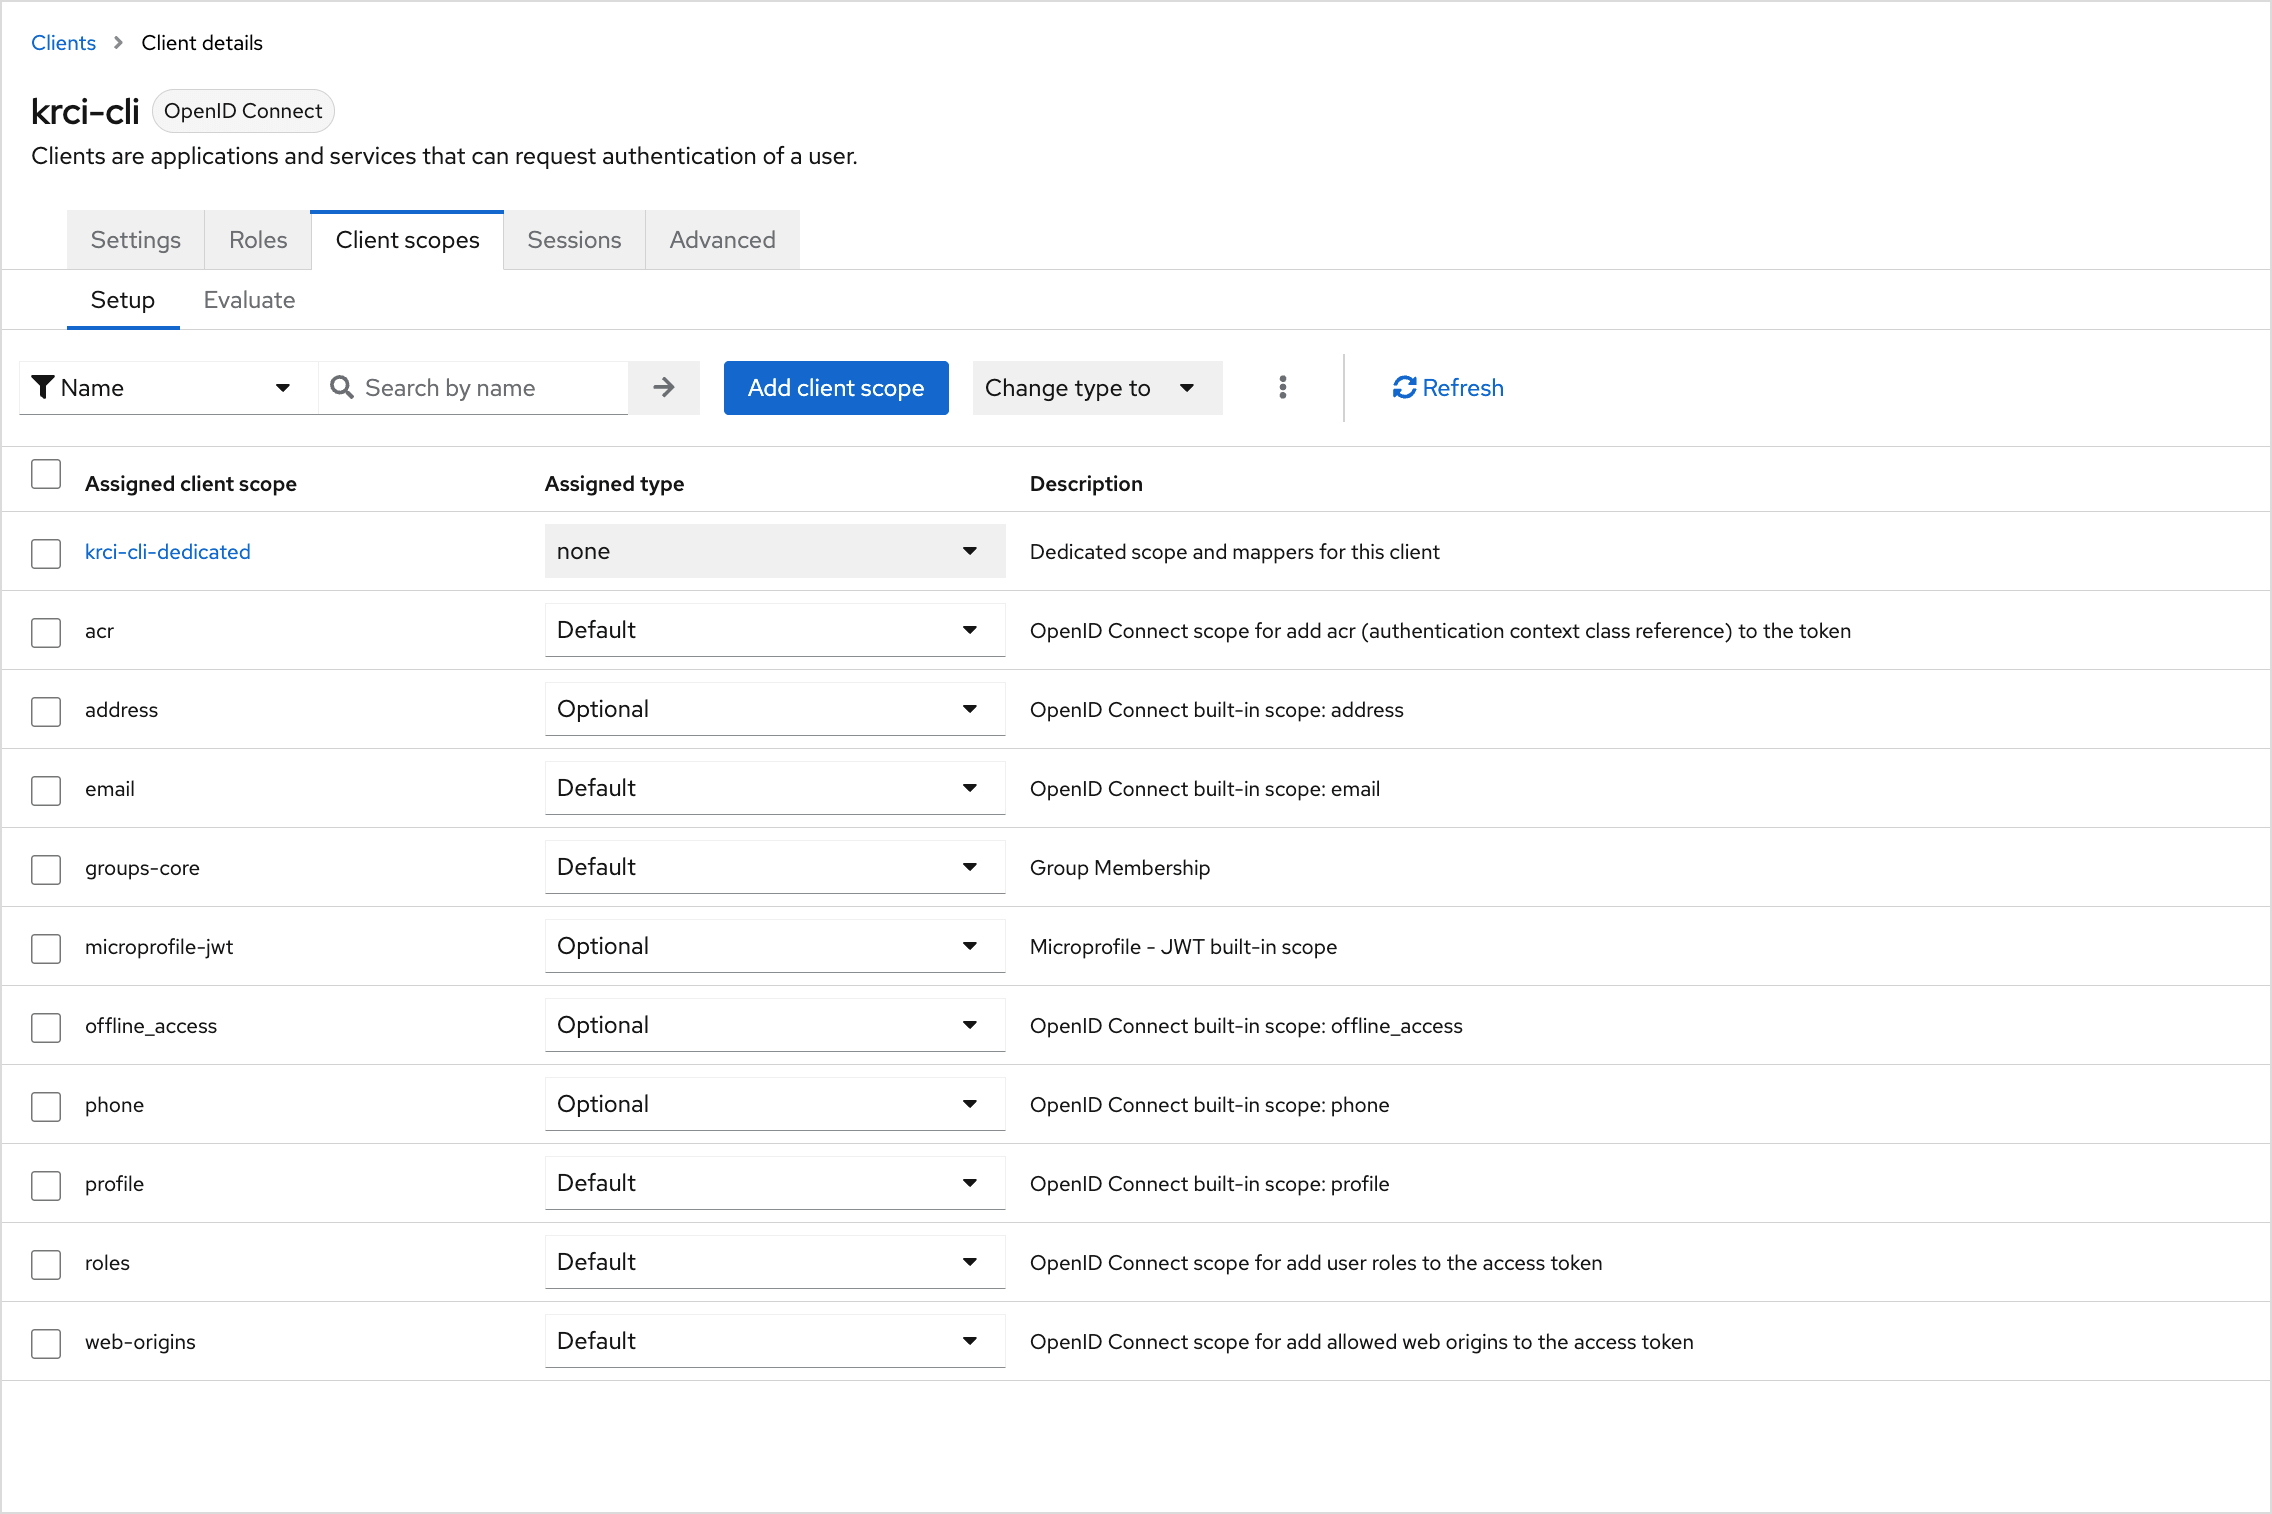
Configure Client Scopes
To configure client scopes (openid, profile, email, roles, groups), follow the steps below:
-
Open the Client scopes tab for
krci-cli. -
Under Default client scopes, ensure typical OpenID scopes are present, including
openid,profile,email, androles(exact names can vary slightly by Keycloak version). -
If your Platform expects group membership in tokens, add a groups scope (or your realm’s equivalent, for example a custom groups / groups-core scope) as a Default scope:
- Click Add client scope → choose the groups scope → Add → Default.
If the realm has no suitable groups scope yet:
- Go to Client scopes in the left sidebar → Create client scope.
- Set Name (for example
groups), Type Default, Protocol OpenID Connect, then save. - Open that scope → Mappers → Configure a new mapper → Group Membership with settings such as:
- Token Claim Name:
groups - Full group path: Off
- Add to ID token / Add to access token / Add to userinfo: On (as required by your cluster and Portal)
- Token Claim Name:
- Return to the
krci-cliclient → Client scopes → add the new scope as Default.
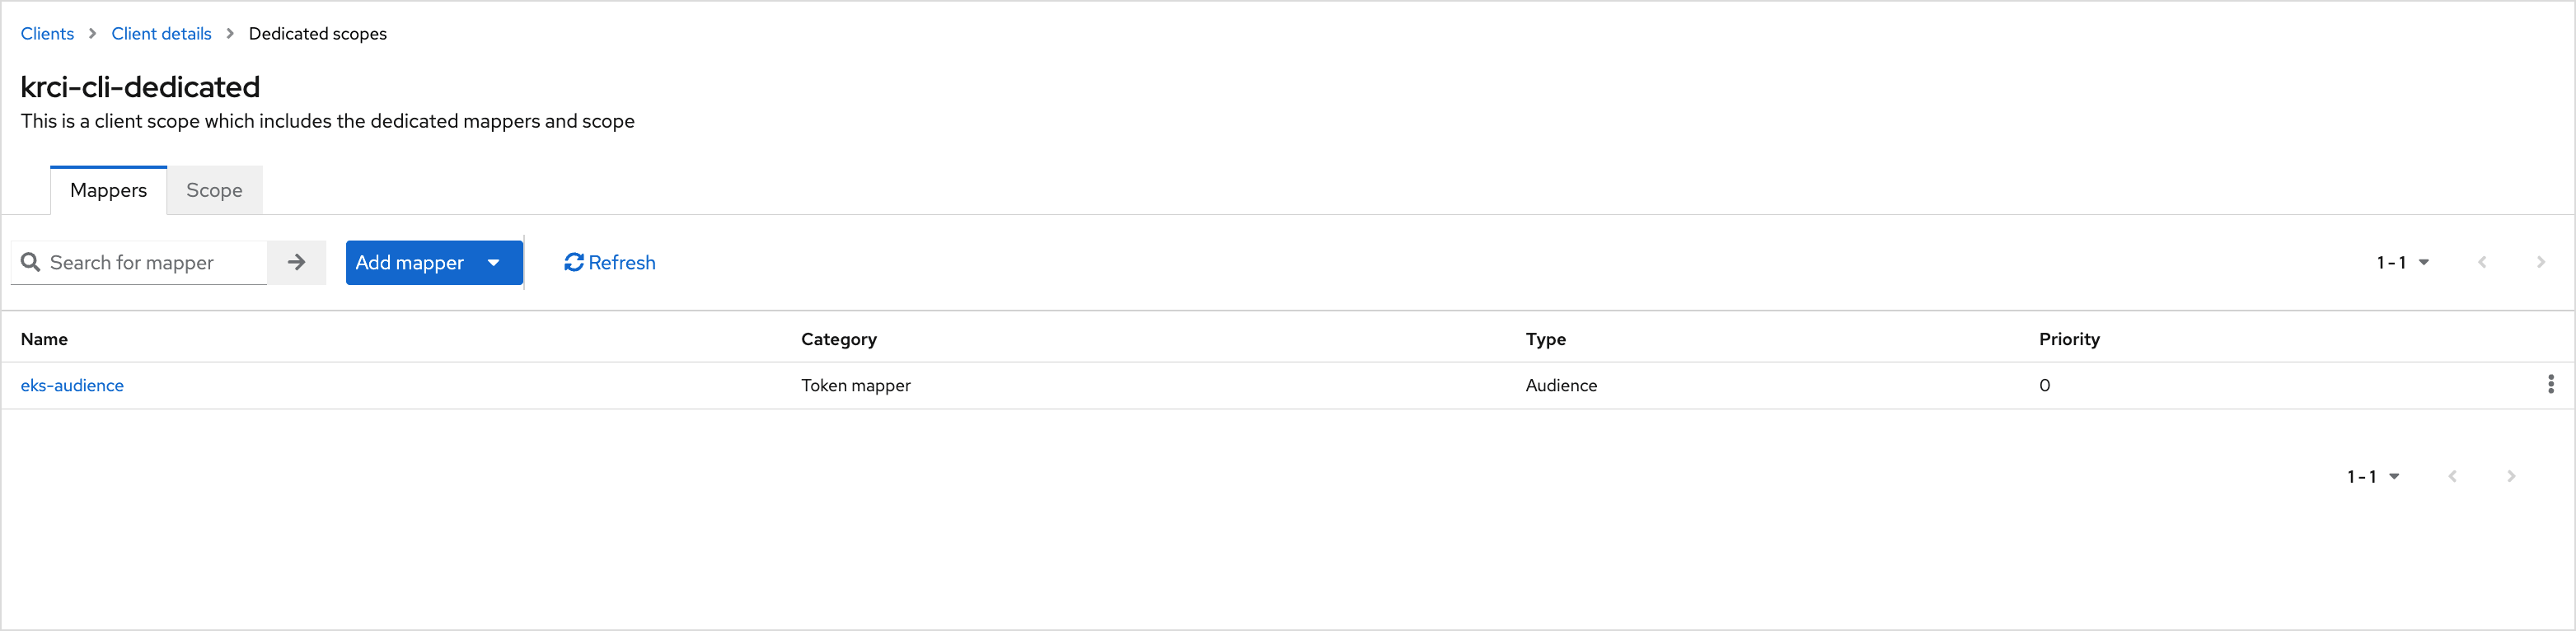
Configure Audience Mapper for Kubernetes API
The same ID token can be validated by the Kubernetes API server (when OIDC is enabled on the cluster). Add an Audience mapper on the dedicated client scope Keycloak creates for this client (name pattern krci-cli-dedicated):
-
On
krci-cli→ Client scopes tab, click the dedicated scopekrci-cli-dedicated. -
Open the Mappers tab → Configure a new mapper → Audience.
-
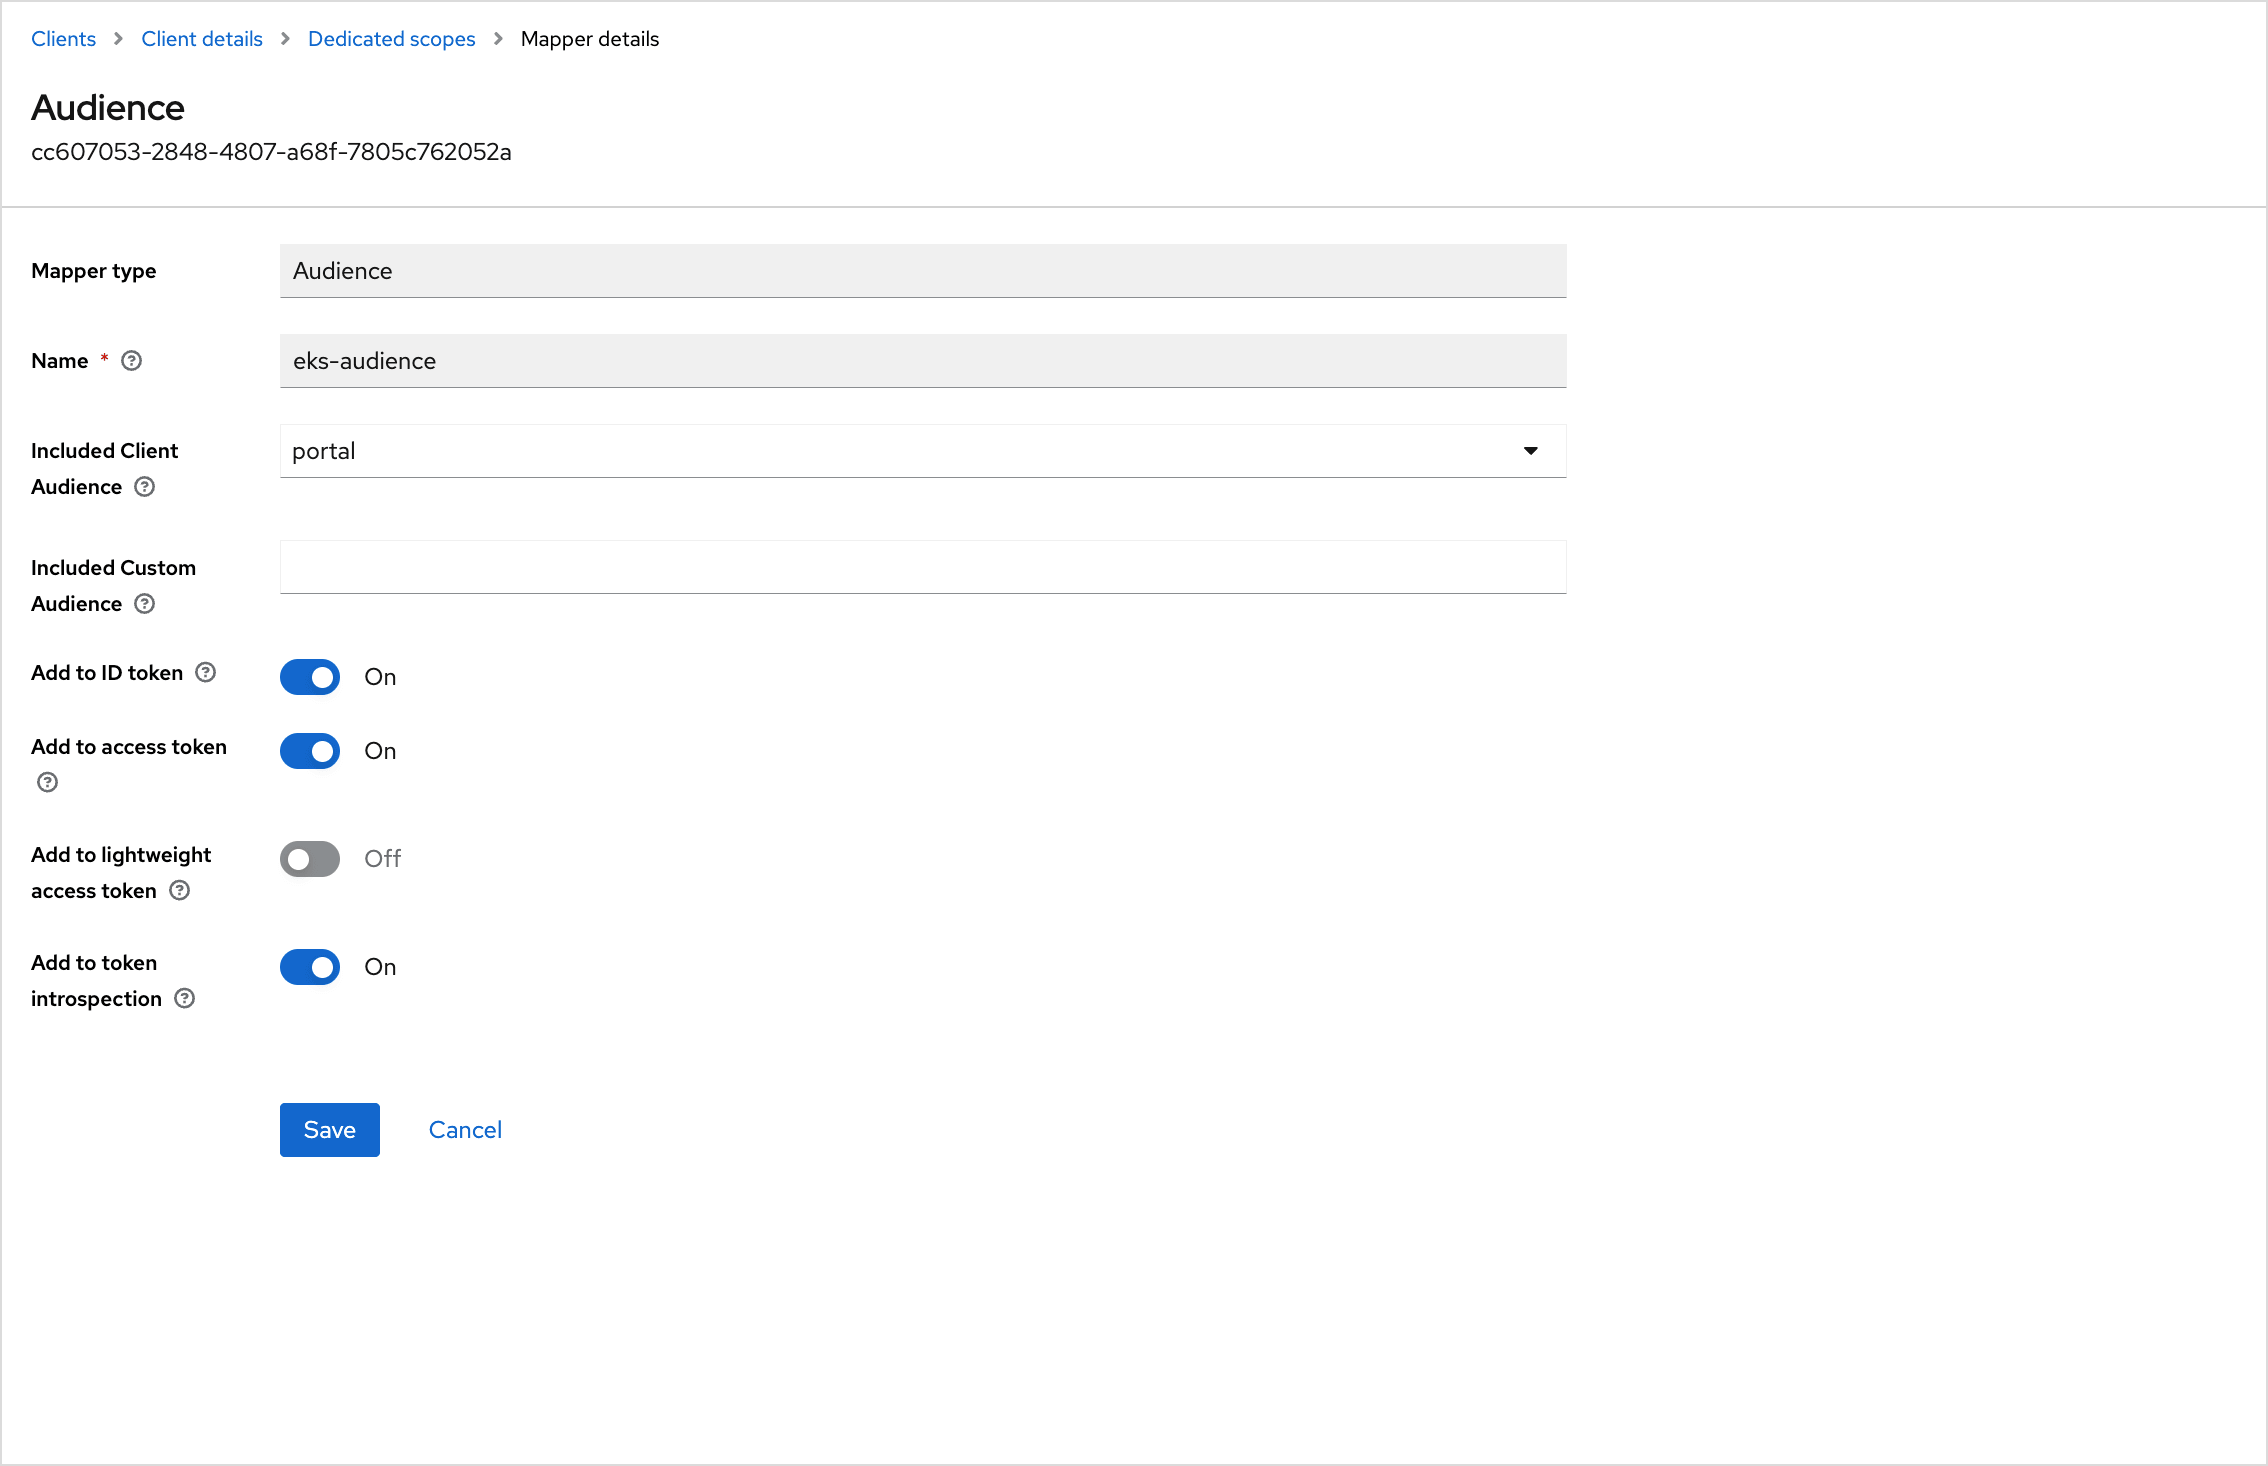
Configure the mapper so the issued token’s
audclaim includes both the CLI client ID and the value your API server uses for--oidc-client-id(oftenkubernetes):Field Suggested value Name k8s-audience(or any descriptive name)Included Client Audience (optional) depends on whether you model audience as another client Included Custom Audience kubernetes(or the exact--oidc-client-idvalue on the API server)Add to ID token On Add to access token On Add to lightweight access token Off -
Save the mapper.
If you also change the API server to expect aud: kubernetes, ensure the Portal client’s tokens carry a compatible audience as well, or Portal logins and API calls may fail. Align this step with your EKS / cluster OIDC configuration.
The following screenshots show the Mappers list on the dedicated scope and an example Audience mapper form. Field names and whether you use Included Client Audience vs Included Custom Audience depend on your Keycloak version and how cluster OIDC is configured.
Verify Configuration
To ensure everything is configured properly, carefully read the checklist below:
- Clients →
krci-cli→ Settings: Client ID, Standard flow enabled, redirect URIs includehttp://127.0.0.1/*andhttp://localhost/*. - Advanced: PKCE code challenge method S256.
- Client scopes: Default scopes include
openid, profile-related scopes, email, roles, and your groups scope as required. - Client scopes →
krci-cli-dedicated→ Mappers: audience mapper present and aligned with cluster--oidc-client-id.
Test From Workstation
Run the command below in a terminal (replace the Portal URL with yours):
krci auth login --portal-url https://portal.example.com
Expected behavior:
- A browser window opens on the Keycloak login page.
- After successful login (and consent, if enabled), the browser redirects to
http://localhost:<random-port>/callback?code=.... - The terminal prints a success message with the signed-in identity.
Decode the ID token (for example with jwt.io or your own tooling) and confirm claims similar to:
{
  "iss": "https://keycloak.example.com/realms/your-realm",
  "aud": ["krci-cli", "kubernetes"],
  "azp": "krci-cli",
  "email": "user@example.com",
  "groups": ["admin", "developers"]
}
If aud does not include your Kubernetes OIDC client ID, revisit Configure Audience Mapper for Kubernetes API. If groups (or your chosen claim) is missing, revisit Configure Client Scopes.