Atlantis: Enterprise-Grade Terraform Automation for Kubernetes
Atlantis is an enterprise-ready tool for automating Terraform workflows in Kubernetes environments. It provides a robust web interface and seamlessly integrates with version control systems (VCS) to automatically run Terraform operations as part of the pull request process. This enables teams to systematically review, approve, and apply infrastructure changes in a consistent, secure, and auditable manner.
This guide covers the full process of installing and configuring Atlantis as Helm chart. It includes setting up authentication, configuring integration with supported version control systems (such as Bitbucket, GitHub, or GitLab), and preparing Atlantis to automate Terraform workflows triggered by pull/merge requests.
Prerequisites
To install and configure Atlantis, ensure the following prerequisites are met:
- A running AWS EKS cluster with the necessary IAM permissions to create IAM roles.
- A Git repository containing Terraform code with the required repository structure is created.
- An Atlantis Git user is created with a generated Access Token.
- A forked copy of the edp-cluster-add-ons repository for managing the Atlantis installation is cloned to the local machine.
- Helm is installed and configured.
- kubectl is installed and configured.
- (Optional) Argo CD is installed and configured.
- (Optional) External Secrets Operator is installed and configured.
- (Optional) Keycloak and keycloak-operator is installed and configured.
Configuring Atlantis
All configuration steps described in this section are based on the Atlantis Helm chart that can be found in the edp-cluster-add-ons repository.
This section describes how to configure Atlantis for integration with supported version control systems (VCS), including setting up authentication for Atlantis Web Server, configuring Webhooks, and creating the AWS IAM Role which is required for Atlantis to perform Terraform operations on the selected provider.
Authentication Configuration
By default, Atlantis Web Server is deployed without any authentication mechanism, which means it is publicly accessible. This setup is not recommended, as it exposes the Atlantis UI and related operations to unauthorized access.
This section describes two approaches to configure authentication for Atlantis Web Server:
- Basic Authentication: A simple method that restricts access using a static username and password, stored as a Kubernetes secret.
- External Authentication Proxy: A more advanced method that delegates authentication to an external identity provider (e.g., Keycloak) using an authentication proxy tools like oauth2-proxy. This method provides role-based access control and centralized user management.
Basic Authentication
For more details on configuring basic authentication, refer to the Atlantis Security documentation page.
To configure Basic Authentication for Atlantis Web Server, follow the steps below:
-
Create a Kubernetes secret containing the username and password for Basic Authentication:
There are two ways to create a secret: manually using the
kubectlcommand or using the External Secrets Operator (ESO).kubectl
Run the following command to create a secret:
kubectl create secret generic atlantis-creds -n atlantis \
  --from-literal=username=<username> \
  --from-literal=password=<password>
The
usernameandpasswordare the credentials that will be used to access the Atlantis Web Server.External Secrets Operator
Enable ESO section in the
values.yamlfile and configure the necessary parameters. For example:eso:
# -- Install components of the ESO.
enabled: true
# -- Defines provider type. One of `aws`, `generic`, or `vault`.
provider: "aws"
# -- Defines the path to the secret in the provider. If provider is `vault`, this is the path must be prefixed with `secret/`.
secretPath: "/infra/core/addons/atlantis"
# -- AWS configuration (if provider is `aws`).
aws:
# -- AWS region.
region: "eu-central-1"
# -- AWS role ARN for the ExternalSecretOperator to assume.
roleArn: "arn:aws:iam::012345678910:role/AWSIRSA_Shared_ExternalSecretOperatorAccess"Specify the
usernameandpasswordfields in the AWS Parameter Store object. For example:{
"oauth2-proxy": {
"client-id": "",
"cookie-secret": ""
},
"bitbucket_token": "",
"bitbucket_secret": "",
"username": "<username>",
"password": "<password>",
"clientSecret": ""
}After configuring the ESO section, the External Secrets Operator will automatically create the Kubernetes secret
atlantis-credsduring installation or upgrade of the Atlantis Helm chart. -
Update the
values.yamlfile to enable Basic Authentication by setting theatlantis.basicAuthSecretNamefield to the name of the secret created in the previous step. For example:values.yamlatlantis:
basicAuthSecretName: atlantis-creds -
Apply the changes by using the
helm upgradecommand or syncing the Argo CD application.
After configuring and enabling Basic Authentication, users will be required to provide the username and password to access the Atlantis Web Server.
External Authentication Proxy (OAuth2 Proxy)
To configure an external authentication proxy (e.g., OAuth2 Proxy) with Keycloak for Atlantis Web Server, follow the steps below:
-
Ensure that the Keycloak and keycloak-operator are installed and configured.
-
Update the
values.yamlby setting theoidc.enabledfield totruefor enabling KeycloakClient resource creation. For example:values.yamloidc:
enabled: true -
Create a Kubernetes secret containing the Keycloak client credentials. The secret should include the
clientSecretfield with the value of the Keycloak client secret. For example:noteThe
keycloak-client-atlantis-secretis used by keycloak-operator to create theKeycloakClientresource.kubectl
Run the following command to create a secret:
kubectl create secret generic keycloak-client-atlantis-secret -n atlantis \
  --from-literal=clientSecret=<keycloak_client_secret>
The
clientSecretis a random generated string that is used to authenticate the Atlantis client with Keycloak. It can be generated using the following command:openssl rand -base64 32 | head -c 32External Secrets Operator
Enable ESO section in the
values.yamlfile and configure the necessary parameters. For example:eso:
# -- Install components of the ESO.
enabled: true
# -- Defines provider type. One of `aws`, `generic`, or `vault`.
provider: "aws"
# -- Defines the path to the secret in the provider. If provider is `vault`, this is the path must be prefixed with `secret/`.
secretPath: "/infra/core/addons/atlantis"
# -- AWS configuration (if provider is `aws`).
aws:
# -- AWS region.
region: "eu-central-1"
# -- AWS role ARN for the ExternalSecretOperator to assume.
roleArn: "arn:aws:iam::012345678910:role/AWSIRSA_Shared_ExternalSecretOperatorAccess"Specify the
clientSecretfield in the AWS Parameter Store object. For example:{
"oauth2-proxy": {
"client-id": "",
"cookie-secret": ""
},
"bitbucket_token": "",
"bitbucket_secret": "",
"username": "",
"password": "",
"clientSecret": "<keycloak_client_secret>"
}The
clientSecretis a random generated string that is used to authenticate the Atlantis client with Keycloak. It can be generated using the following command:openssl rand -base64 32 | head -c 32After configuring the ESO section, the External Secrets Operator will automatically create the Kubernetes secret
keycloak-client-atlantis-secretduring installation or upgrade of the Atlantis Helm chart. -
Enable the
oauth2-proxysection in thevalues.yamlfile and configure the necessary parameters for the external authentication proxy. For example:values.yamloauth2-proxy:
enabled: true
extraArgs:
# Skip authentication for /events endpoint to allow Git webhook access
skip-auth-regex: "^/events$"
config:
configFile: |-
allowed_roles = ["administrator", "developer"]
client_id = "atlantis"
code_challenge_method="S256"
cookie_csrf_expire="5m"
cookie_csrf_per_request="true"
cookie_domains = ["atlantis.example.com"]
cookie_secure = "true"
email_domains = [ "*" ]
insecure_oidc_allow_unverified_email = "true"
oidc_issuer_url = "https://keycloak.example.com/realms/<realm_name>"
pass_access_token = "true"
pass_authorization_header = "true"
pass_basic_auth = "false"
provider = "keycloak-oidc"
redirect_url = "https://atlantis.example.com/oauth2/callback"
skip_jwt_bearer_tokens = "true"
upstreams = [ "http://atlantis:80" ]
whitelist_domains = [".example.com"]
silence_ping_logging = "true"
existingSecret: oauth2-proxy
ingress:
enabled: true
hosts:
- atlantis.example.com -
Create a Kubernetes secret
oauth2-proxycontaining theclient-id,client-secret, andcookie-secretvalues. Theclient-idandclient-secretvalues should match the Keycloak client credentials. Thecookie-secretvalue is a random string used to encrypt the session cookies:kubectl
Run the following command to create a secret:
kubectl create secret generic oauth2-proxy -n atlantis \
  --from-literal=client-id=atlantis \
  --from-literal=client-secret=<keycloak_client_secret> \
  --from-literal=cookie-secret=<random_generated_string>
The
client-secretis the random string generated in the previous step.The
cookie-secretis a random generated string that is used to encrypt the session cookies. It can be generated using the following command:openssl rand -base64 32 | head -c 32External Secrets Operator
Enable ESO section in the
values.yamlfile and configure the necessary parameters. For example:eso:
# -- Install components of the ESO.
enabled: true
# -- Defines provider type. One of `aws`, `generic`, or `vault`.
provider: "aws"
# -- Defines the path to the secret in the provider. If provider is `vault`, this is the path must be prefixed with `secret/`.
secretPath: "/infra/core/addons/atlantis"
aws:
# -- AWS region.
region: "eu-central-1"
# -- AWS role ARN for the ExternalSecretOperator to assume.
roleArn: "arn:aws:iam::012345678910:role/AWSIRSA_Shared_ExternalSecretOperatorAccess"Specify the
oauth2-proxysection in the AWS Parameter Store object. Also, make sure that theclientSecretfield is included. For example:{
"oauth2-proxy": {
"client-id": "atlantis",
"cookie-secret": "<random_generated_string>"
},
"bitbucket_token": "",
"bitbucket_secret": "",
"username": "",
"password": "",
"clientSecret": "<keycloak_client_secret>"
}The
clientSecretis the random string generated in the previous step.The
oauth2-proxy.cookie-secretis a random generated string that is used to encrypt the session cookies. It can be generated using the following command:openssl rand -base64 32 | head -c 32After configuring the ESO section, the External Secrets Operator will automatically create the Kubernetes secret
oauth2-proxyduring installation or upgrade of the Atlantis Helm chart. -
Apply the changes by using the
helm upgradecommand or syncing the Argo CD application. -
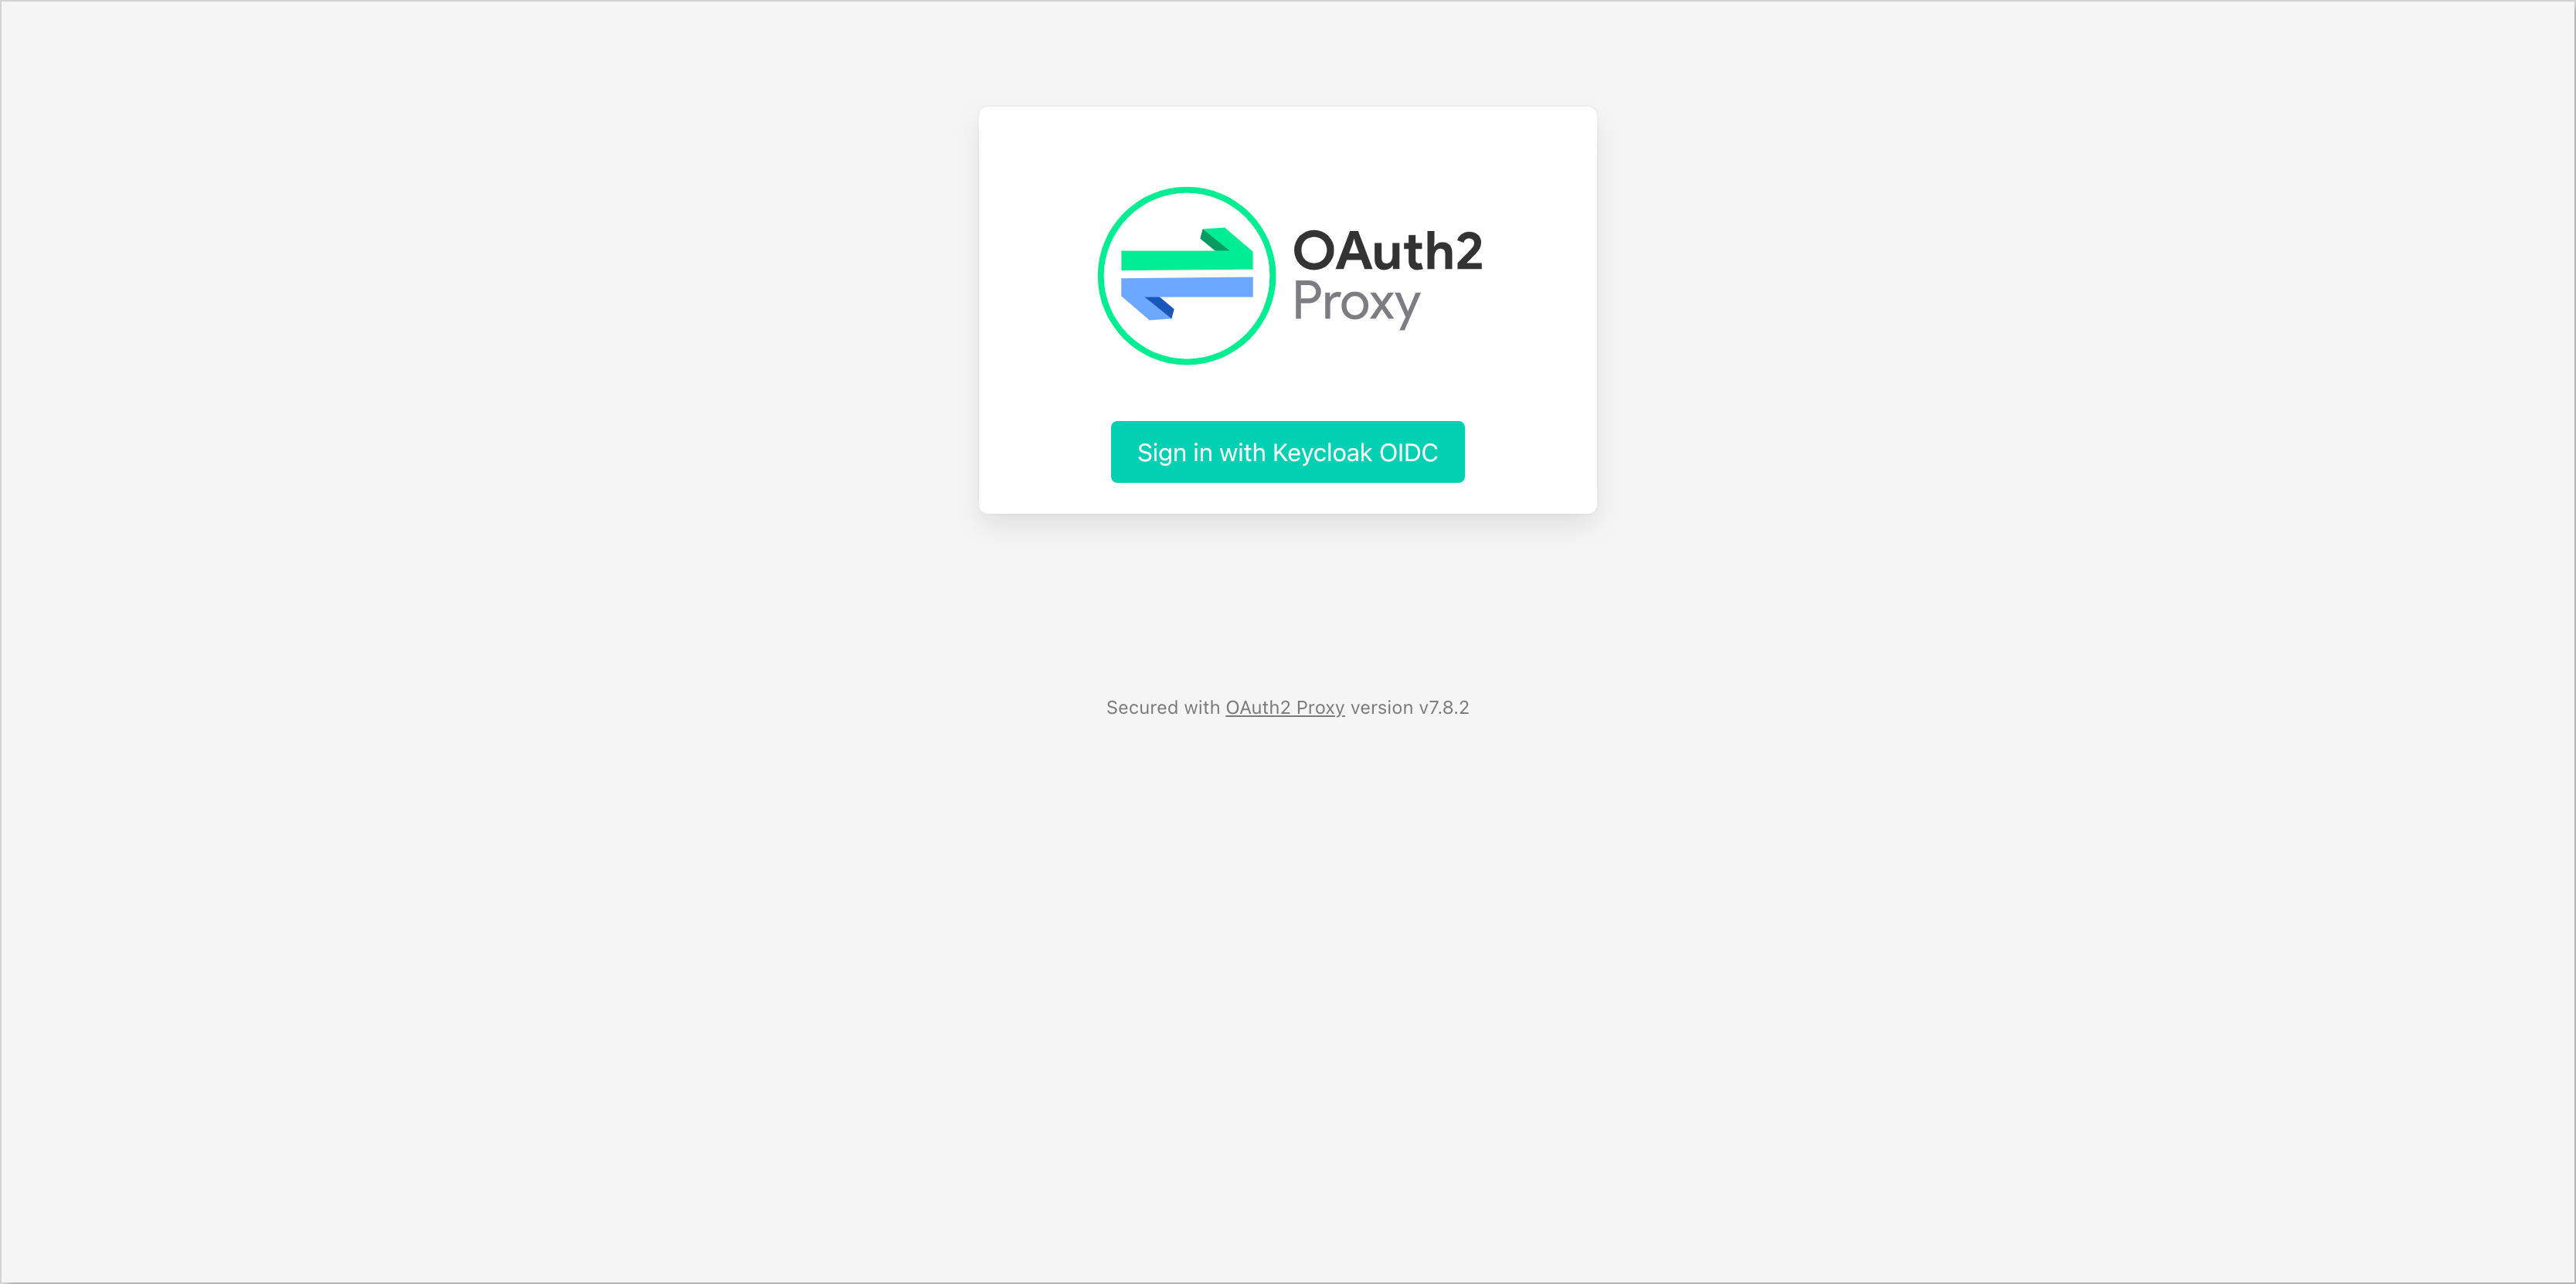
After configuring the external authentication proxy, users will be required to authenticate using Keycloak credentials to access the Atlantis Web Server:
Webhook Configuration
For more details on configuring webhooks, refer to the Atlantis Webhook documentation.
Atlantis requires a webhook to be configured in the Git repository to trigger Terraform operations. The webhook should be set up to send events to the Atlantis Web Server URL.
For each supported VCS, follow the steps below to configure the webhook:
- GitHub
- GitLab
- Bitbucket
To configure the Atlantis webhook in GitHub, follow these steps:
- In the GitHub repository, navigate to Settings -> Webhooks.
- Click Add webhook.
- Set the Payload URL to
http://<atlantis-url>/eventsorhttps://<atlantis-url>/events(if using SSL). - Set the Content type to
application/json. - In the Secret field, provide the secret generated for the webhook.
- Select Let me select individual events and choose the events you want to trigger the webhook, such as:
- Pull request reviews
- Pushes
- Issue comments
- Pull requests
- Leave the Active option enabled.
- Click Add webhook to save the configuration.

To configure the Atlantis webhook in GitLab, follow these steps:
- In the GitLab repository, navigate to Settings -> Webhooks.
- Click Add new webhook.
- Set the Name to
atlantis. - Set the URL to
http://<atlantis-url>/eventsorhttps://<atlantis-url>/events(if using SSL). - In the Secret token field, provide the secret generated for the webhook.
- Select the events you want to trigger the webhook, such as:
- Push events
- Comments
- Merge Request events
- Click Add webhook to save the configuration.

To configure the Atlantis webhook in Bitbucket, follow these steps:
- In the Bitbucket repository, navigate to Repository Settings. Under the Workflow section, select Webhooks.
- Click Add webhook.
- Set the Title to
atlantis. - Set the URL to
http://<atlantis-url>/eventsorhttps://<atlantis-url>/events(if using SSL). - In the Secret field, provide the secret generated for the webhook.
- In the Triggers section, uncheck all options for Repository and Issue events. For Pull Request events, select the following:
- Created
- Updated
- Merged
- Declined
- Comment
- Click Save to save the configuration.

After configuring the webhook, it is necessary to create the Atlantis webhook Kubernetes secret. This secret should contain the Access Token and Secret fields, which are used to authenticate the webhook requests sent from the VCS to the Atlantis Web Server.
-
Create a Kubernetes webhook secret containing the Access Token and Secret parameters.
kubectl
noteIt is also possible to specify tokens and webhook secrets for multiple providers in the same Kubernetes secret. Atlantis will automatically use the appropriate fields based on the provider specified in the webhook configuration.
Run the following command to create a secret with the Git provider credentials.
For Bitbucket, run the following command:
kubectl create secret generic atlantis-webhook \
  --from-literal=bitbucket_token=<bitbucket_token> \
  --from-literal=bitbucket_secret=<bitbucket_secret>
The
bitbucket_tokenis the generated Access Token for the Bitbucket user.The
bitbucket_secretis the generated secret for the Bitbucket webhook.For GitHub, run the following command:
kubectl create secret generic atlantis-webhook \
  --from-literal=github_token=<github_token> \
  --from-literal=github_secret=<github_secret>
The
github_tokenis the generated Access Token for the GitHub user.The
github_secretis the generated secret for the GitHub webhook.For GitLab, run the following command:
kubectl create secret generic atlantis-webhook \
  --from-literal=gitlab_token=<gitlab_token> \
  --from-literal=gitlab_secret=<gitlab_secret>
The
gitlab_tokenis the generated Access Token for the GitLab user.The
gitlab_secretis the generated secret for the GitLab webhook.External Secrets Operator
Enable ESO section in the
values.yamlfile and configure the necessary parameters. For example:eso:
# -- Install components of the ESO.
enabled: true
# -- Defines provider type. One of `aws`, `generic`, or `vault`.
provider: "aws"
# -- Defines the path to the secret in the provider. If provider is `vault`, this is the path must be prefixed with `secret/`.
secretPath: "/infra/core/addons/atlantis"
aws:
# -- AWS region.
region: "eu-central-1"
# -- AWS role ARN for the ExternalSecretOperator to assume.
roleArn: "arn:aws:iam::012345678910:role/AWSIRSA_Shared_ExternalSecretOperatorAccess"Specify the Git provider token and Webhook secret in the AWS Parameter Store object.
noteIt is also possible to specify tokens and webhook secrets for multiple providers in the same AWS Parameter Store object. The External Secrets Operator will automatically create the
atlantis-webhookKubernetes secret with the multiple fields based on the provided parameters.For Bitbucket:
{
  "oauth2-proxy": {
    "client-id": "",
    "cookie-secret": ""
  },
  "bitbucket_token": "<bitbucket_token>",
  "bitbucket_secret": "<bitbucket_secret>",
  "username": "",
  "password": "",
  "clientSecret": ""
}
The
bitbucket_tokenis the generated Access Token for the Bitbucket user.The
bitbucket_secretis the generated secret for the Bitbucket webhook.For GitHub:
{
  "oauth2-proxy": {
    "client-id": "",
    "cookie-secret": ""
  },
  "github_token": "<github_token>",
  "github_secret": "<github_secret>",
  "username": "",
  "password": "",
  "clientSecret": ""
}
The
github_tokenis the generated Access Token for the GitHub user.The
github_secretis the generated secret for the GitHub webhook.For GitLab:
{
  "oauth2-proxy": {
    "client-id": "",
    "cookie-secret": ""
  },
  "gitlab_token": "<gitlab_token>",
  "gitlab_secret": "<gitlab_secret>",
  "username": "",
  "password": "",
  "clientSecret": ""
}
The
gitlab_tokenis the generated Access Token for the GitLab user.The
gitlab_secretis the generated secret for the GitLab webhook.After configuring the ESO section, the External Secrets Operator will automatically create the Kubernetes secret
atlantis-webhookduring installation or upgrade of the Atlantis Helm chart. -
Update the
values.yamlfile to enable the webhook secret by setting theatlantis.vcsSecretNamefield to the name of the secret created in the previous step. For example:values.yamlatlantis:
vcsSecretName: atlantis-webhook -
Apply the changes by using the
helm upgradecommand or syncing the Argo CD application.
After configuring the webhook secret, Atlantis will be able to authenticate incoming webhook requests from the VCS.
Provider Credentials
For more details on configuring provider credentials, refer to the Atlantis Provider Credentials documentation.
Depending on the selected provider, Atlantis needs to be provided with the necessary permissions to perform Terraform operations. In this section, it is described how to create the required AWS IAM Role or use the built-in Atlantis IAM Role from the terraform-aws-platform repository.
Creating Atlantis IAM Role
To create the AWS IAM Role for Atlantis, follow the steps below:
-
Navigate to the AWS Management Console and open the IAM service.
-
Under the Access management section, select Roles.
-
Click Create role.
-
Select Web identity as the trusted entity type.
-
In the Web identity section, select the OIDC provider for appropriate EKS cluster and the audience (
sts.amazonaws.com). -
Add the condition to the trust policy to allow the Atlantis service account to assume the role. The condition should include the following values:
- Key -
oidc.eks.<region>.amazonaws.com/id/<OIDC_PROVIDER>:sub - Condition -
StringLike - Value -
system:serviceaccount:<atlantis-namespace>:<atlantis-service-account-name>

- Key -
-
Click Next to proceed to the permissions page.
-
On the Add permissions page, attach the necessary policies for Atlantis to perform Terraform operations. Select the permissions boundary if required.

-
Click Next to proceed to the review page.
-
Provide a name for the role and review the configuration. Click Create role to create the role.

After creating the AWS IAM Role, it is necessary to attach the role to the Atlantis service account. This can be done by updating the values.yaml file of the Atlantis Helm chart.
-
Navigate to the
clusters/core/addons/atlantisdirectory of the forked edp-cluster-add-ons repository. -
Open the
values.yamlfile and update theatlantis.serviceAccount.annotationsfield to include the ARN of the created AWS IAM Role. For example:values.yamlatlantis:
serviceAccount:
annotations:
eks.amazonaws.com/role-arn: arn:aws:iam::<AWS_ACCOUNT_ID>:role/<ROLE_NAME> -
Apply the changes by using the
helm upgradecommand or syncing the Argo CD application.
After configuring the AWS IAM Role, Atlantis will be able to assume the role and perform Terraform operations using the provided permissions.
Using built-in Atlantis IAM Role
For more details about Atlantis IAM Role creation, refer to the terraform-aws-platform repository.
In case of using the terraform-aws-platform repository to manage the AWS infrastructure, Atlantis can use the built-in Atlantis IAM Role created by the repository. This IAM Role is automatically created and configured with the necessary permissions to assume the KRCIDeployerRole IAM Role for performing Terraform operations.
To use the built-in Atlantis IAM Role, follow the steps below:
-
Navigate to the AWS Management Console and open the IAM service.
-
Under the Access management section, select Roles. Ensure that the Atlantis IAM Role is created. If not, create the role using the Deploy AWS EKS Cluster guide.
-
Navigate to the
clusters/core/addons/atlantisdirectory of the forked edp-cluster-add-ons repository. -
Open the
values.yamlfile and update theatlantis.serviceAccount.annotationsfield to include the ARN of the Atlantis IAM Role. For example:values.yamlatlantis:
serviceAccount:
annotations:
eks.amazonaws.com/role-arn: arn:aws:iam::<AWS_ACCOUNT_ID>:role/Atlantis -
Apply the changes by using the
helm upgradecommand or syncing the Argo CD application.
After configuring the AWS IAM Role, Atlantis will be able to assume the KRCIDeployerRole IAM Role and perform Terraform operations using the provided permissions.
Installing Atlantis
There are two approaches to install Atlantis using edp-cluster-add-ons repository:
- Using Argo CD: This approach implies installing Atlantis as an Argo CD Application resource.
- Using Helm: This approach involves installing Atlantis via common Helm commands.
Approach 1: Using Argo CD
For more information on configuring edp-cluster-add-ons repository, refer to the Install via Add-Ons page.
The first approach is to deploy Atlantis using Argo CD. Follow the steps below to install Atlantis using Argo CD:
-
Clone the forked edp-cluster-add-ons repository.
-
Navigate to the
clusters/core/addons/atlantisdirectory and configure thevalues.yamlfile with the necessary values for the Atlantis installation. -
After configuring the Atlantis Helm chart values, navigate to the
clusters/core/appsdirectory. In thevalues.yamlfile, update theatlantissection by specifying theenablefield astrueto enable Argo CD Application creation for the Atlantis. Modify thecreateNamespaceandnamespacefields as needed. For example:atlantis:
createNamespace: true
enable: true
namespace: atlantis -
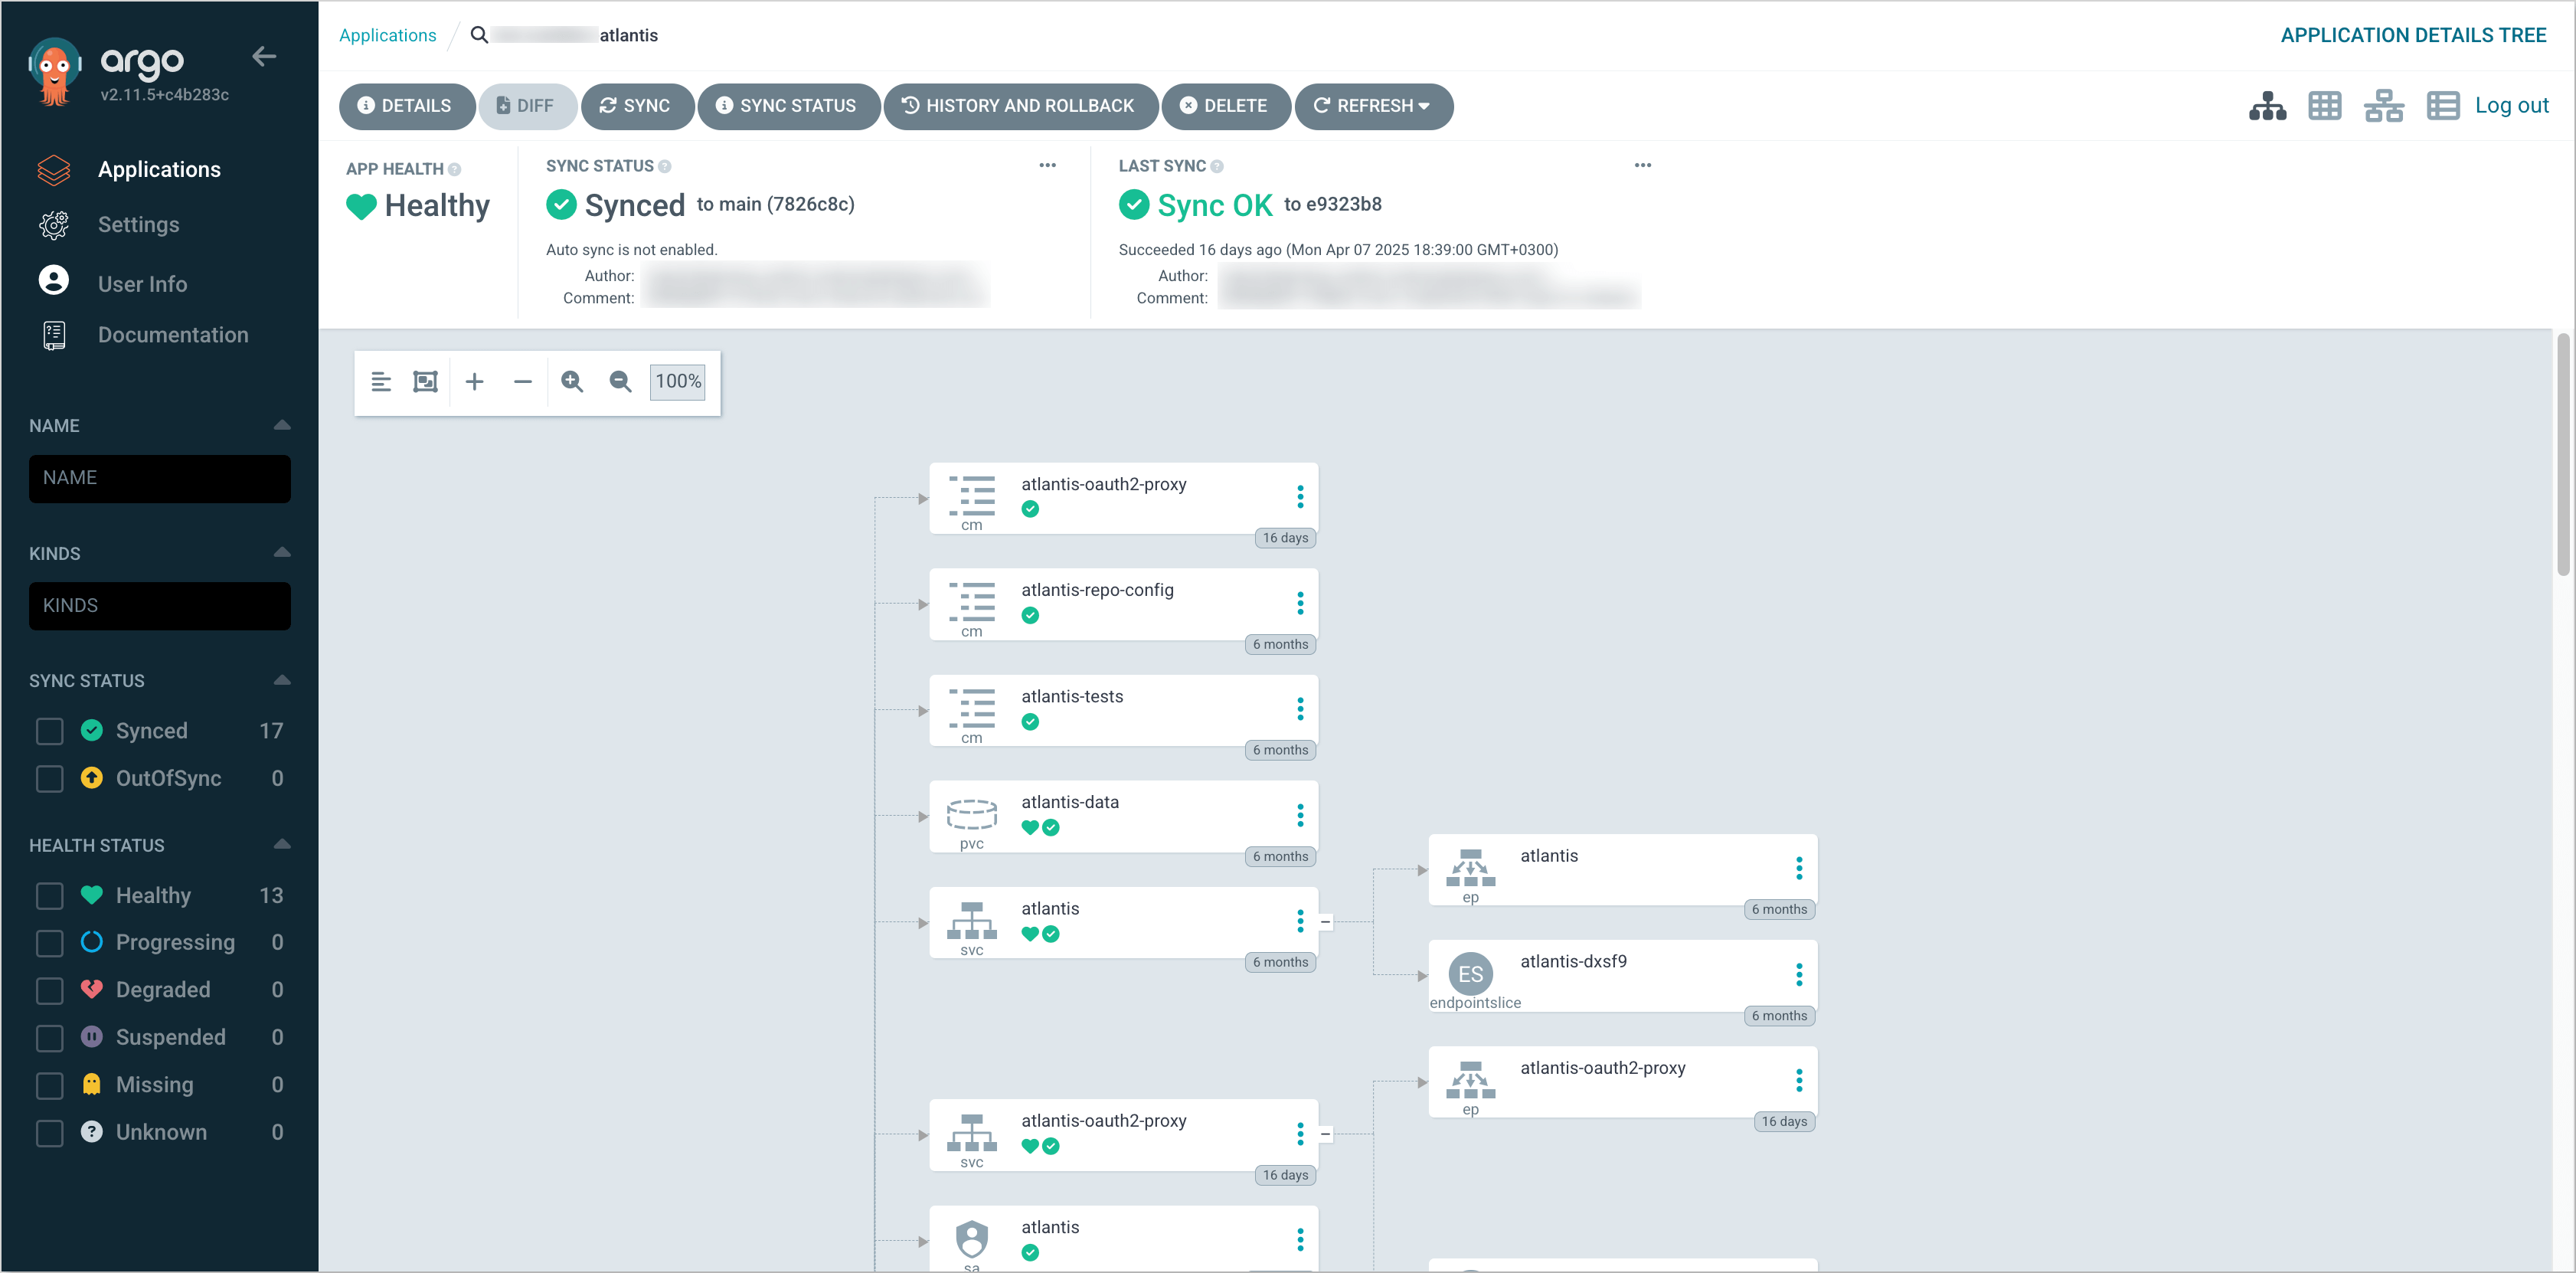
Commit and push the changes to the remote repository. After the changes are pushed, navigate to the Argo CD and sync the Atlantis application. Verify that the Atlantis is successfully deployed:
Approach 2: Deploy Using Helm
The second approach is to deploy Atlantis using Helm. Follow the steps below to install Atlantis using Helm:
-
Clone the forked edp-cluster-add-ons repository.
-
Navigate to the
clusters/core/addons/atlantisdirectory and configure thevalues.yamlfile with the necessary values for the Atlantis installation. -
After configuring the Atlantis Helm chart values, run the following command to deploy the Atlantis:
helm upgrade --install atlantis . -n atlantis --create-namespace -
Verify that the Atlantis is successfully deployed.